
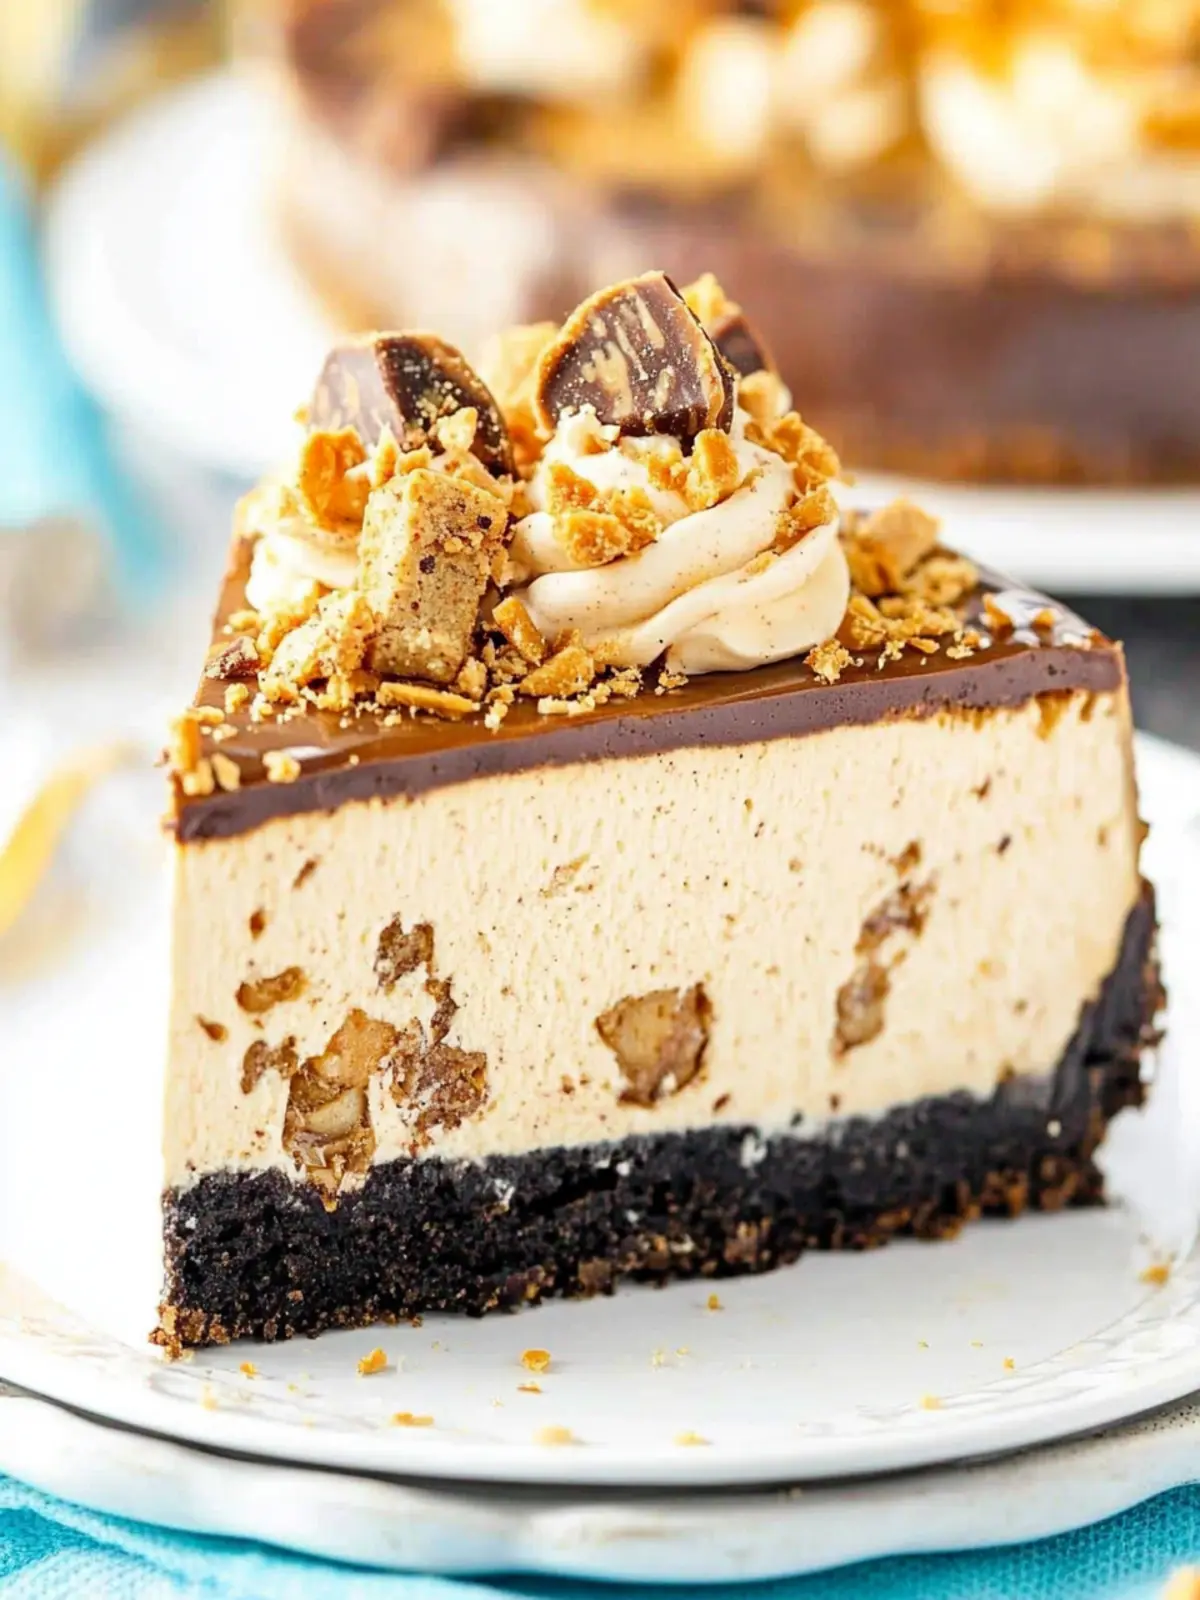
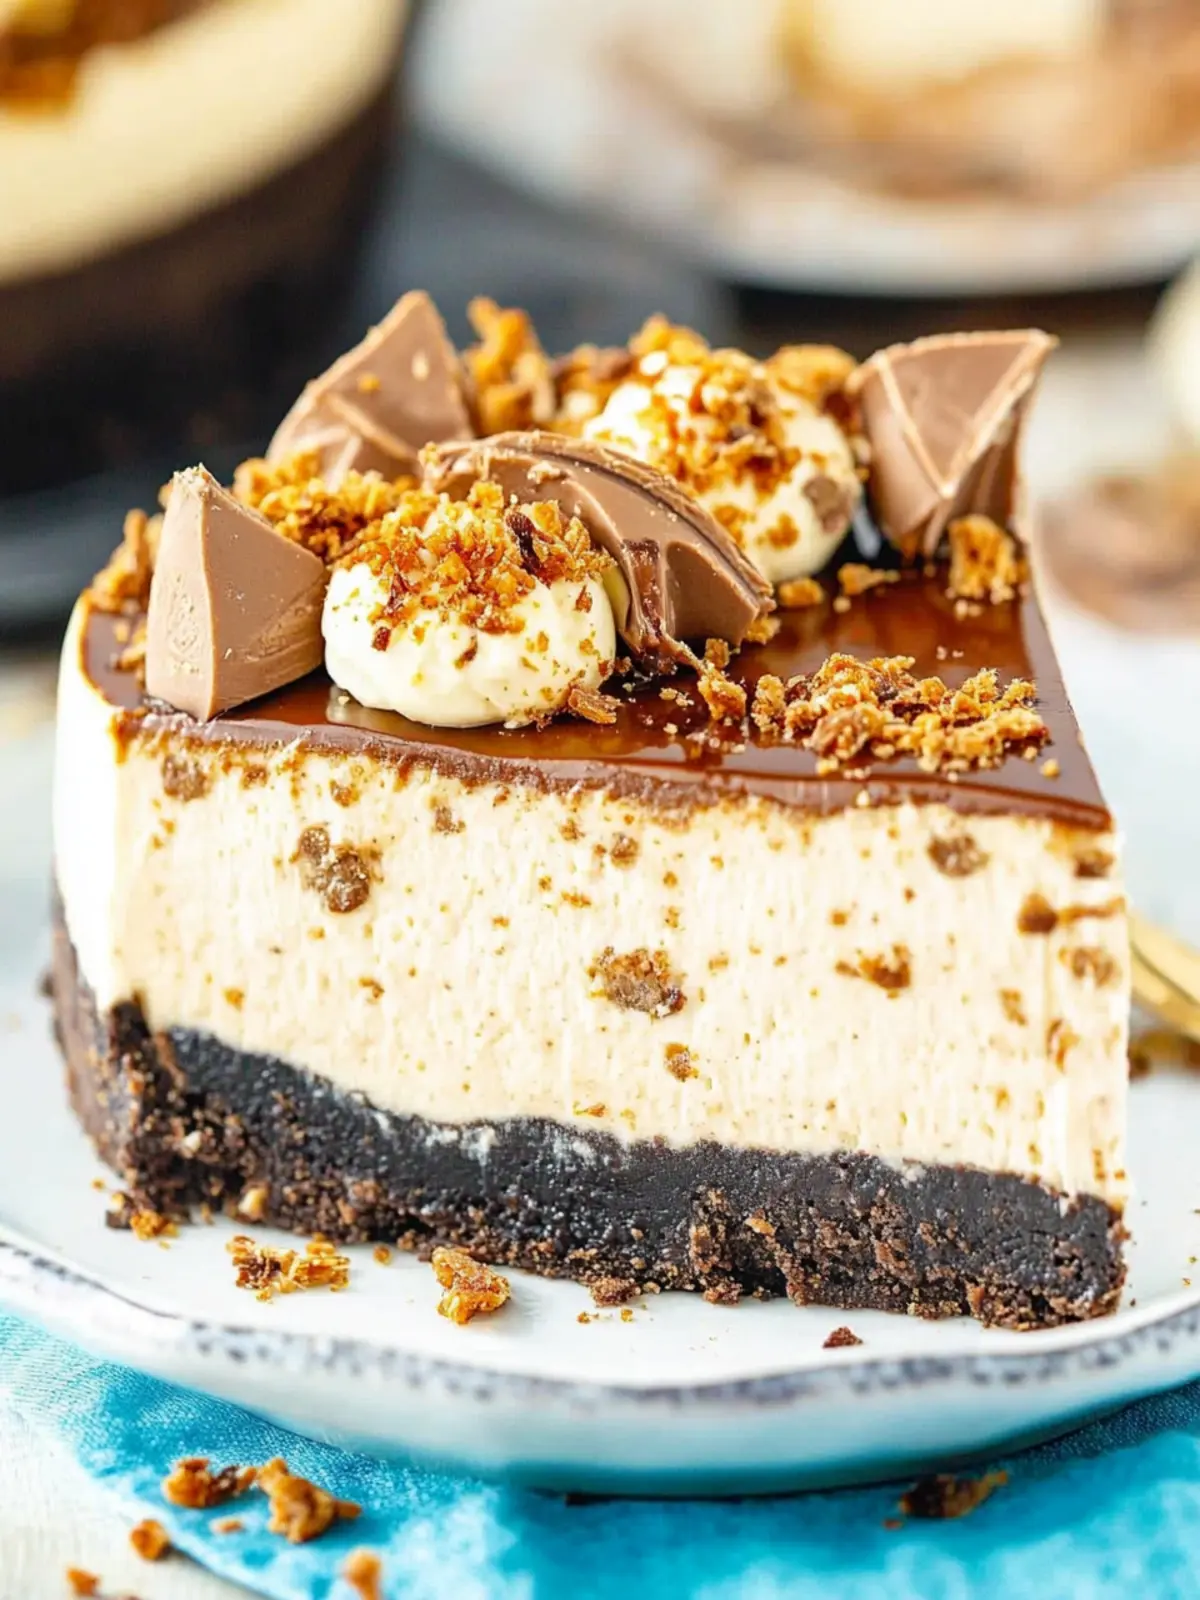
There’s an undeniable joy that comes from transforming simple ingredients into something magical, and this Peanut Butter Butterfinger Cheesecake is the perfect example. Picture this: a creamy, rich cheesecake that combines the beloved flavors of peanut butter and chocolate, all while boasting the delightful crunch of Butterfinger bars. This indulgent dessert is not just a treat for the taste buds; it’s a showstopper that will elevate any gathering.
After a long week, I found myself craving something sweet yet extraordinary. I wanted to escape the mundane routine of takeout pizzas and quick pre-packaged desserts. That’s when I decided to whip up this Butterfinger Cheesecake—a recipe that marries the nostalgia of childhood candy bars with a velvety cream cheese filling. With every bite, you’ll experience a delightful contrast of textures and flavors that is sure to please family and friends alike.
So, roll up your sleeves and prepare for a fun kitchen adventure! This cheesecake is a labor of love that delivers a taste of pure happiness, making it the perfect finale to any meal. Let’s dive into the deliciousness!

Why Love This Butterfinger Cheesecake?
Indulgent flavor that combines rich peanut butter and chocolate creates a mouthwatering experience that can’t be beaten. Crowd-pleaser status: This show-stopping dessert is perfect for gatherings, ensuring your friends and family will rave about it! Textural delight is achieved with a fudgy crust and crunchy Butterfinger pieces. Versatility shines through, making it a hit for any occasion, from birthdays to holidays. Plus, time well spent offers a memorable baking experience that’s entirely worth it! For an extra treat, check out our guide on how to make homemade whipped cream!
Butterfinger Cheesecake Ingredients
Prepare to indulge in this delightful Butterfinger Cheesecake with a luscious blend of flavors!
For the Crust
- Oreo crumbs – a sweet and crunchy base that perfectly complements the creamy filling.
- Salted butter – binds the crumbs together while adding a rich flavor.
For the Cheesecake Filling
- Cream cheese – provides that creamy, smooth texture essential for cheesecake.
- Sugar – sweetens the filling, balancing the rich ingredients.
- All-purpose flour – helps stabilize the filling, ensuring it sets just right.
- Sour cream – adds a tangy flavor and extra creaminess.
- Peanut butter – brings that delicious nutty taste, making this a Butterfinger cheesecake!
- Vanilla extract – enhances all the flavors with a warm and inviting note.
- Large eggs – incorporated for richness and the perfect texture.
For the Butterfinger Crunch
- Chopped Butterfingers – add that irresistible crunch and flavor boost throughout the cheesecake.
For the Chocolate Ganache
- Semi-sweet chocolate chips – the base for a luscious, silky topping.
- Heavy whipping cream – adds richness and makes the ganache smooth and decadent.
For the Whipped Cream Topping
- Heavy whipping cream – whips up fluffy and light, perfect for decorating.
- Powdered sugar – sweetens the whipped cream without the graininess of granulated sugar.
- Peanut butter – adds another layer of delicious taste to the topping.
- Vanilla extract – familiar flavor that rounds out the whipped topping.
For the Garnish
- Chopped Butterfingers – a fun and tasty decorative touch that draws everyone in!
How to Make Butterfinger Cheesecake
-
Preheat Oven: Set your oven to 325°F (163°C). Prepare a 9-inch (23cm) springform pan by lining the bottom with parchment paper and greasing the sides generously.
-
Make Crust: In a small bowl, mix the Oreo crumbs and melted butter until well combined. Press this mixture firmly into the bottom of your prepared springform pan, creating a solid base.
-
Bake Crust: Place the crust in the preheated oven and bake for 10 minutes. Once done, remove it and allow it to cool while you get the filling ready.
-
Prepare Foil Wrap: Carefully cover the outside of the springform pan with aluminum foil to prevent water from the water bath from getting in. Set the prepared pan aside.
-
Reduce Temperatures: Lower the oven temperature to 300°F (148°C) for the cheesecake baking step to ensure a gentle cook.
-
Chop Butterfingers: Take those delightful Butterfinger bars and chop them into bite-sized pieces. Set them aside for later.
-
Mix Filling: In a large bowl, beat the cream cheese, sugar, and flour together on low speed until the mixture is smooth and creamy. Don’t forget to scrape down the sides of the bowl to combine everything well!
-
Incorporate Creaminess: Add in the sour cream, peanut butter, and vanilla extract. Mix on low speed again until everything is blended beautifully.
-
Add Eggs: Introduce the eggs one at a time, gently mixing after each addition. This will help keep the texture light and airy, so remember to scrape the sides down as needed!
-
Fold in Crunch: Gently stir in the chopped Butterfingers, ensuring they are evenly distributed throughout the creamy filling.
-
Pour Batter: Carefully pour the cheesecake batter over the cooled crust in the springform pan, smoothing out the top with a spatula.
-
Create Water Bath: Place the springform pan inside a larger pan, and fill the outer pan with warm water until it reaches halfway up the sides of the springform. This helps the cheesecake bake evenly.
-
Bake Cheesecake: Bake in the oven for 1 hour and 25 minutes. The center should be set but still have a slight jiggle, which means perfection is just around the corner!
-
Cool Off: Turn off the oven and keep the door closed for 30 minutes. This slow cooling helps prevent cracks in the cheesecake.
-
Let It Breathe: After 30 minutes, crack the oven door open and let the cheesecake cool further for another 30 minutes.
-
Chill: Once cooled, remove the cheesecake from the oven and water bath. Refrigerate it until firm, at least 5-6 hours or overnight for the best results.
-
Release Cheesecake: When ready, gently remove the cheesecake from the springform pan and transfer it to a serving plate.
-
Make Ganache: For that luscious chocolate layer, place the chocolate chips in a heat-proof bowl.
-
Heat Cream: In another heat-proof bowl, microwave the heavy whipping cream until it just starts to boil, then pour it over the chocolate chips.
-
Whisk Together: Allow the mixture to sit for 2-3 minutes, then whisk until it turns into a smooth and glossy ganache.
-
Spread Ganache: Gently pour the ganache over the cheesecake and spread it into an even layer with a spatula.
-
Prepare Whipped Cream: In a large mixing bowl, add heavy whipping cream, powdered sugar, peanut butter, and vanilla extract. Whip on high speed until stiff peaks form.
-
Decorate Cheesecake: Transfer the whipped cream to a piping bag fitted with a piping tip. Pipe decorative shells around the circumference of the cheesecake.
-
Add Garnish: Top the whipped cream shells with a sprinkle of chopped Butterfingers to give your cheesecake an irresistible finish!
-
Final Chill: Refrigerate the cheesecake until you’re ready to serve it for the ultimate flavor experience!
Optional: Top with a drizzle of extra peanut butter for extra indulgence.
Exact quantities are listed in the recipe card below.
Make Ahead Options
These Peanut Butter Butterfinger Cheesecakes are perfect for meal prep, saving you valuable time during busy weeks! You can prepare the cheesecake filling and crust up to 24 hours in advance; simply keep them stored separately in airtight containers in the refrigerator to maintain their freshness. For the crust, press the Oreo mixture into the pan and cover it tightly with plastic wrap. When you’re ready to bake, pour the filling into the chilled crust, and proceed with the baking instructions. After the cheesecake has cooled and chilled for at least 5-6 hours (or overnight), finish with the ganache and whipped cream right before serving for that just-made taste! Enjoy delicious, time-saving results that leave you free to focus on other essentials.
What to Serve with Butterfinger Cheesecake?
Indulging in a piece of Butterfinger Cheesecake can spark a craving for delightful accompaniments that elevate your dining experience.
- Decadent Coffee: A rich cup of coffee enhances the creamy flavors, pairing beautifully while its bitterness balances the sweetness of the cheesecake.
- Fresh Berries: Bright, juicy berries like strawberries or raspberries cut through the richness, adding a refreshing contrast to each bite.
- Vanilla Ice Cream: A scoop of vanilla ice cream on the side adds extra creaminess, creating a delightful melting experience when combined with warm ganache.
- Chocolate Drizzle: A glossy drizzle of chocolate sauce adds an extra layer of decadence and a touch of elegance to your presentation.
- Nutty Trail Mix: A handful of nutty trail mix creates a crunchy texture that complements the cheesecake’s creaminess while bringing additional flavor depth.
- Sparkling Water: A chilled glass of sparkling water with lemon is a refreshing palate cleanser, ensuring every bite is as delightful as the last.
- Caramel Sauce: Drizzling warm caramel sauce over the cheesecake enhances its sweetness and adds a luxurious, silky element.
- Fizzy Fruit Soda: A bubble-laden fruit soda complements the dessert nicely, adding sweetness and effervescence, perfect for a casual celebration.
How to Store and Freeze Butterfinger Cheesecake
-
Room Temperature: Butterfinger cheesecake should not be left out; it’s best enjoyed chilled right from the fridge for optimal texture and flavor.
-
Fridge: Store any leftover cheesecake tightly wrapped in plastic wrap or in an airtight container in the fridge for up to 5 days.
-
Freezer: To freeze, wrap individual slices or the whole cheesecake in plastic wrap, followed by aluminum foil, and it will last up to 3 months.
-
Reheating: If you prefer, thaw the cheesecake overnight in the fridge before indulging. Enjoy chilled for the best taste!
Expert Tips for Butterfinger Cheesecake
-
Room Temperature Ingredients: Allow cream cheese, sour cream, and eggs to reach room temperature. This ensures a smooth, lump-free filling that sets perfectly.
-
Avoid Overmixing: When adding eggs, mix just until combined to keep the filling light and airy. Overmixing can lead to cracks in your Butterfinger cheesecake.
-
Water Bath Importance: Always use a water bath when baking cheesecake. It provides gentle heat, preventing the top from cooking too quickly and causing cracks.
-
Cool Slowly: Follow the cooling steps closely. Letting the cheesecake cool in the oven prevents temperature shocks that could ruin its texture.
-
Chill Time Matters: For the best flavor and texture, chill your cheesecake overnight. This allows the flavors to meld and makes cutting easier.
Butterfinger Cheesecake Variations
Feel free to get creative and customize this dreamy dessert to suit your tastes and dietary needs!
-
Nut-Free: Substitute peanut butter with sunflower seed butter to create a delicious nut-free version that still offers rich flavor.
-
Dairy-Free: Use dairy-free cream cheese and coconut cream to make this cheesecake accessible for those avoiding dairy without sacrificing creaminess.
-
Gluten-Free: Swap out regular Oreo crumbs for gluten-free chocolate cookie crumbs to enjoy the same delightful crust while keeping it gluten-free.
-
Extra Crunchy: Add crushed pretzels to your crust for an appealing salty crunch that contrasts beautifully with the sweet filling, making each bite even more exciting.
-
Chocolate Lovers: Drizzle extra melted chocolate over the top before refrigerating for a more decadent chocolate flavor that any chocoholic will adore!
-
Flavored Whipped Cream: Mix in a splash of hazelnut or coffee extract to your whipped cream for an unexpected flavor twist that complements the cheesecake perfectly.
-
Fruity Addition: Fold in some chopped strawberries or raspberries into the cheesecake batter for a tangy fruity layer that cuts through the richness.
-
Heat It Up: Incorporate a pinch of cayenne pepper or a splash of espresso into the chocolate ganache for a spicy or rich flavor boost that adds depth to the dessert.
Each delightful variation opens the door to new flavor sensations, so don’t hesitate to switch things up and make this Butterfinger Cheesecake your own!
Butterfinger Cheesecake Recipe FAQs
What’s the best way to choose ripe ingredients for Butterfinger Cheesecake?
Absolutely! For this recipe, make sure your cream cheese is at room temperature for a smooth blend. Look for fresh eggs—large and without cracks—for optimal texture. When selecting Butterfinger bars, aim for the freshest ones without visible damage or signs of age.
How should I store Butterfinger Cheesecake after baking?
The more the merrier! Cover leftover cheesecake tightly with plastic wrap or place it in an airtight container. It can be stored in the refrigerator for up to 5 days. Keeping it tightly sealed will help maintain its creamy texture and delicious flavors.
Can I freeze Butterfinger Cheesecake?
Yes! To freeze, either wrap the entire cheesecake tightly in plastic wrap followed by aluminum foil or slice it into individual portions and wrap each slice separately. Properly sealed, it can last up to 3 months in the freezer. When you’re ready to enjoy it, thaw the cheesecake in the refrigerator overnight for the best results.
My cheesecake cracked while baking, what went wrong?
Very! Cracks usually occur from overmixing or sudden temperature changes. To prevent this, make sure your ingredients are at room temperature before mixing. Also, follow the cooling instructions to slowly reduce the temperature instead of removing it abruptly from the oven. A water bath helps retain moisture and regulate temperature as well.
Is this Butterfinger Cheesecake suitable for those with nut allergies?
Of course! To make this recipe nut-free, simply omit the peanut butter from the cheesecake filling and consider using a nut-free chocolate option for the ganache and decorations. Always check for cross-contamination if serving someone with allergies, and provide alternative desserts as needed.
How long does the cheesecake need to chill before serving?
You’ll want to refrigerate the cheesecake for at least 5-6 hours—or ideally, overnight. This rest period allows the flavors to meld beautifully and ensures the cheesecake is firm enough for slicing, delivering that perfect creamy texture you’re looking for!

Irresistible Butterfinger Cheesecake with Crunchy Layers
Ingredients
Equipment
Method
- Preheat Oven: Set your oven to 325°F (163°C). Prepare a 9-inch (23cm) springform pan by lining the bottom with parchment paper and greasing the sides generously.
- Make Crust: In a small bowl, mix the Oreo crumbs and melted butter until well combined. Press this mixture firmly into the bottom of your prepared springform pan.
- Bake Crust: Place the crust in the preheated oven and bake for 10 minutes. Once done, remove it and allow it to cool.
- Prepare Foil Wrap: Carefully cover the outside of the springform pan with aluminum foil to prevent water from the water bath from getting in.
- Reduce Temperatures: Lower the oven temperature to 300°F (148°C) for the cheesecake baking.
- Chop Butterfingers: Take the Butterfinger bars and chop them into bite-sized pieces.
- Mix Filling: In a large bowl, beat the cream cheese, sugar, and flour together until smooth.
- Incorporate Creaminess: Add in the sour cream, peanut butter, and vanilla extract and mix well.
- Add Eggs: Introduce the eggs one at a time, mixing gently after each addition.
- Fold in Crunch: Gently stir in the chopped Butterfingers, ensuring they are evenly distributed.
- Pour Batter: Carefully pour the cheesecake batter over the cooled crust, smoothing out the top.
- Create Water Bath: Place the springform pan inside a larger pan, and fill the outer pan with warm water halfway up the sides.
- Bake Cheesecake: Bake in the oven for 1 hour and 25 minutes.
- Cool Off: Turn off the oven and keep the door closed for 30 minutes.
- Let It Breathe: After 30 minutes, crack the oven door open and let the cheesecake cool further for another 30 minutes.
- Chill: Remove the cheesecake and refrigerate until firm, at least 5-6 hours or overnight.
- Release Cheesecake: Gently remove the cheesecake from the springform pan.
- Make Ganache: Place the chocolate chips in a bowl.
- Heat Cream: In another bowl, microwave heavy whipping cream until it starts to boil, then pour it over the chocolate.
- Whisk Together: Whisk until smooth and glossy.
- Spread Ganache: Pour the ganache over the cheesecake.
- Prepare Whipped Cream: Whip heavy whipping cream, powdered sugar, peanut butter, and vanilla extract until stiff peaks form.
- Decorate Cheesecake: Pipe decorative shells around the cheesecake with the whipped cream.
- Add Garnish: Top the whipped cream shells with chopped Butterfingers.
- Final Chill: Refrigerate until ready to serve.