There’s something truly comforting about the golden layers of a freshly baked Potato Pave. As the rich aroma of clarified butter fills the kitchen, it instantly transforms your space into a haven of culinary delight. I first discovered this elegant dish while searching for the perfect side to impress my dinner guests. With its stunningly crispy exterior and buttery soft interior, this French-inspired creation has quickly become a staple in my home.
What I love most is how deceptively simple it is to prepare. No need to stress over complicated techniques or hard-to-find ingredients; just thinly sliced Yukon Gold potatoes, love, and care. Whether you’re hosting an intimate gathering or enjoying a quiet weeknight dinner, these crispy, buttery layers are a guaranteed crowd-pleaser, ready to elevate any meal. Trust me; once you serve up this dish, everyone will be asking for seconds! Let’s dive into the recipe and bring a taste of French elegance to your kitchen.

Crispy, Buttery Layers that Impress?
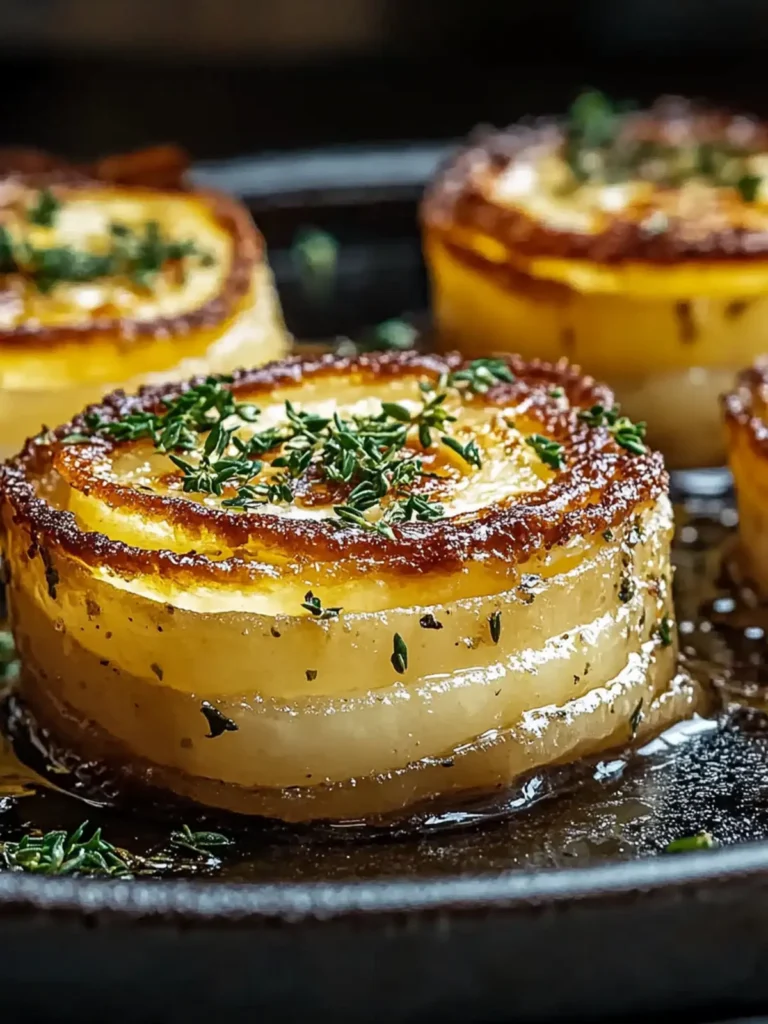
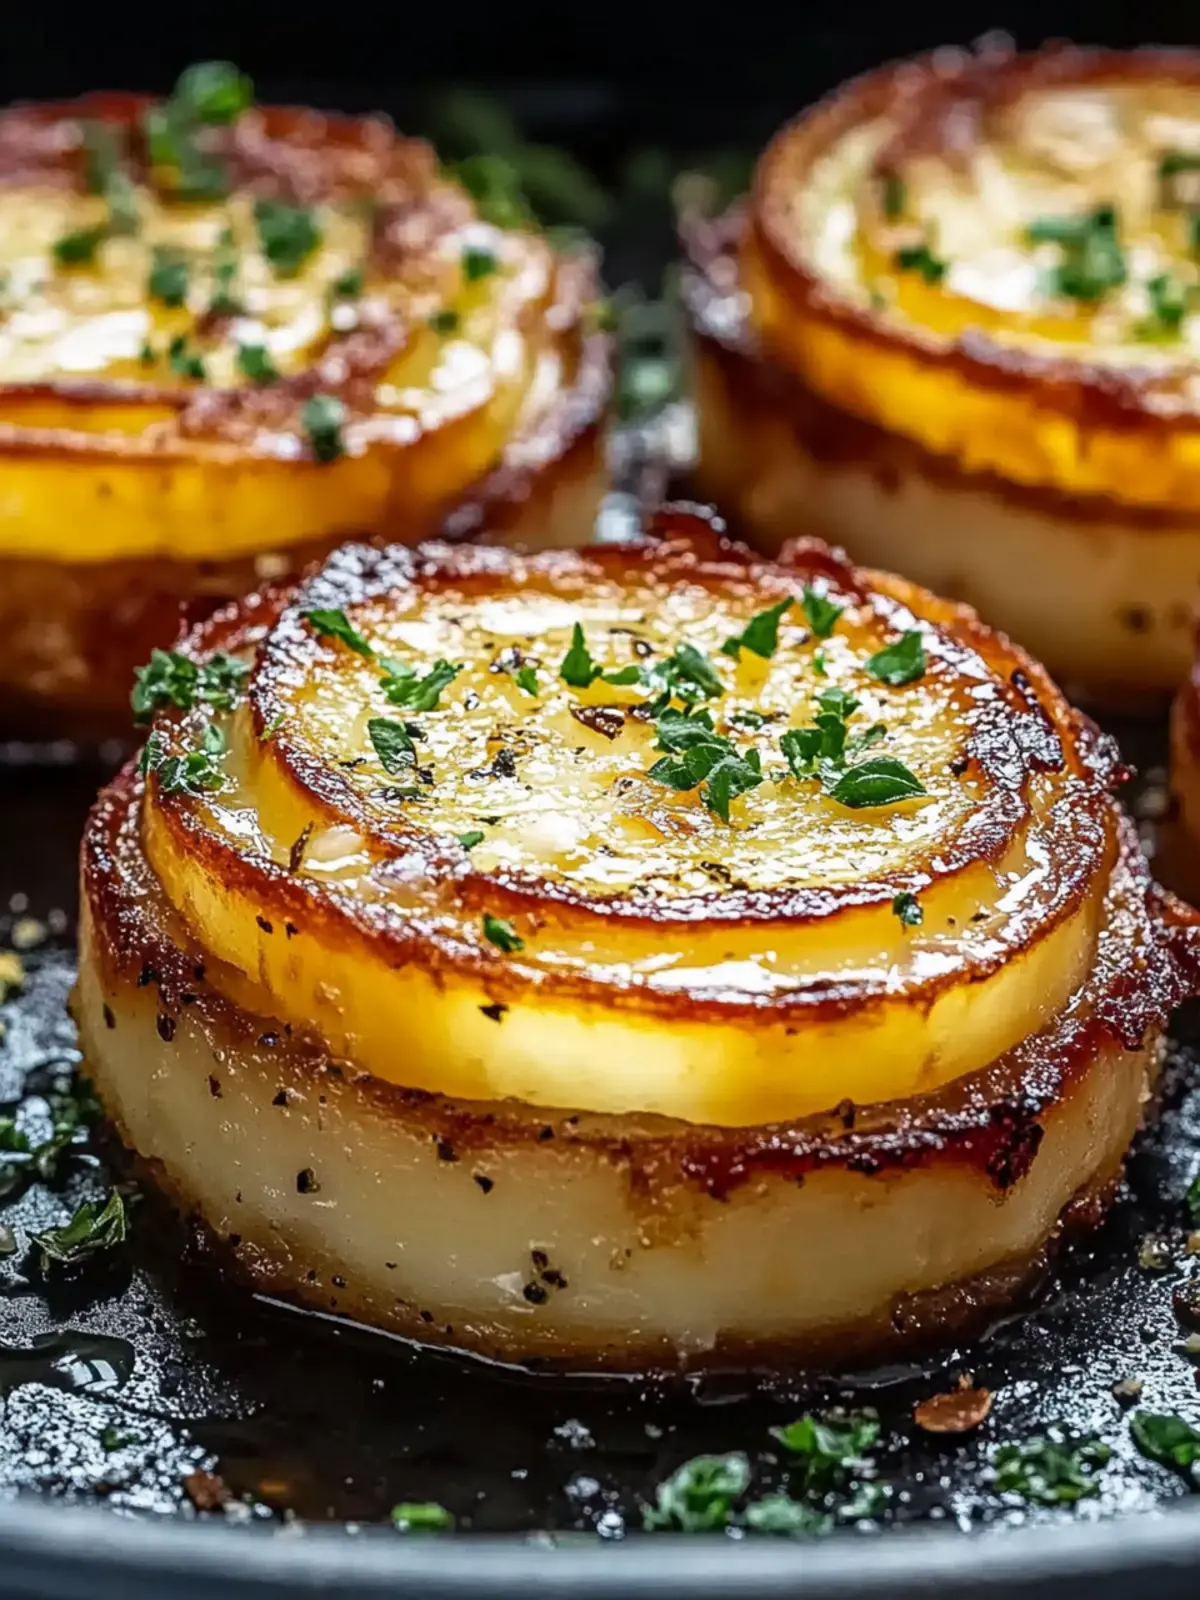
Decadent Layers: This Potato Pave showcases beautifully layered Yukon Gold potatoes, perfectly crisp on the outside yet buttery soft within, creating a dinner showstopper.
Simple Preparation: With no advanced cooking skills required, this recipe is an effortless way to impress your family and friends.
Versatile Side Dish: Pair with roasted chicken or grilled fish for a delightful dining experience, making every meal feel special.
Make-Ahead Magic: Prepare in advance to save time on busy days—just reheat and serve for that fresh-from-the-oven taste.
Elegant Presentation: Serve these square slices to instantly elevate your table, making any gathering feel upscale and refined.
Crispy, Buttery Layers Ingredients
For the Base
• Yukon Gold Potatoes – The star of the dish, providing the perfect balance of starch and moisture, creating those sought-after crispy, buttery layers.
• Salt – Essential for enhancing flavor; feel free to adjust to your taste.
• Black Pepper – Adds a touch of warmth; adjust according to your heat preference.
For the Layering and Cooking
• Clarified Butter or Ghee – Crucial for layering and achieving that crisp texture; swap with olive oil for a dairy-free option, though it may slightly change the crunch.
• Olive Oil or Additional Butter – Use for searing the slices, ensuring a golden, crispy finish.
Optional Flavors
• Garlic (optional) – Smash before adding to infuse aromatic depth throughout your layers.
• Thyme or Rosemary (optional) – Fresh herbs elevate the dish’s complexity; sprinkle between layers for added flavor.
• Parmesan Cheese (optional) – Adds savory richness; a sprinkle between potato layers can elevate the overall taste.
These easy-to-find ingredients come together to create potato pave that’s not just a side dish but a delightful indulgence to impress your guests and elevate your meals!
How to Make Crispy Potato Pave
-
Preheat Oven: Start by preheating your oven to 325°F (160°C). This ensures your Potato Pave bakes to perfection, achieving that desired crispy exterior. Line a loaf pan with parchment paper for easy removal later.
-
Slice Potatoes: Peel and thinly slice your Yukon Gold potatoes into 1/16-inch rounds using a mandoline. Place them in a bowl of cold water to prevent browning, then dry them thoroughly with a clean kitchen towel.
-
Layer Potatoes: Begin layering the potato slices evenly in the prepared pan. Brush each layer generously with clarified butter and sprinkle with salt and black pepper. For added flavor, consider incorporating your optional ingredients like garlic or herbs between layers.
-
Compress Layers: Cover your layered potatoes with a piece of parchment paper, then add aluminum foil on top. Place some weights, such as a heavy skillet or cans, on top to compress the layers, ensuring they meld beautifully during baking.
-
Bake Until Tender: Bake in the preheated oven for 1 hour 45 minutes to 2 hours. Test for doneness by piercing with a knife; it should go through the layers easily when the potatoes are tender.
-
Chill and Set: After baking, allow your Potato Pave to cool to room temperature, then refrigerate it overnight while still pressed. This helps the flavors meld and makes slicing easier.
-
Unmold and Cut: Once chilled, carefully unmold the Potato Pave from the pan, and cut it into squares or rectangles that showcase those gorgeous layers.
-
Sear for Crispness: In a hot nonstick pan, sear each piece in a little butter until both sides are golden brown and crispy. This adds that irresistible texture that will have everyone asking for more.
-
Serve Warm: Finally, serve your warm Potato Pave, optionally garnished with fresh herbs or a drizzle of truffle oil for an extra touch of elegance.
Optional: Drizzle truffle oil over the top for a gourmet finish.
Exact quantities are listed in the recipe card below.

Crispy, Buttery Layers Variations
Feel free to make this dish your own; there are endless possibilities to elevate your Potato Pave experience!
-
Herb Variations: Experiment with fresh dill or chives between the layers to add a vibrant flavor twist to your pave. These herbs bring a lovely freshness that can beautifully complement the richness of the potatoes.
-
Sweet Potato Swap: Use sweet potatoes for a naturally sweeter version of this dish. Adjust the seasonings to balance their sweetness and enjoy a unique flavor profile.
-
Dairy-Free Twist: Substitute clarified butter with olive oil or avocado oil for a dairy-free take. Though the texture may vary, you’ll still enjoy those glorious layers, just with a lighter finish.
-
Cheesy Indulgence: Sprinkle in Gruyère or cheddar cheese between layers for a rich, gooey addition. This creates an even more indulgent dish that cheese lovers will adore.
-
Garlic Infusion: Smash garlic cloves and layer them with potatoes to infuse a delightful aroma and flavor throughout. This simple addition can transform your pave into a garlicky delight!
-
Smoky Flavor: Consider incorporating smoked paprika or a hint of chipotle powder for a subtly smoky depth. This adds a surprise kick that will keep your taste buds engaged.
-
Truffle Essence: For an ultra-luxurious touch, drizzle truffle oil on top before serving. The earthy aroma and flavor of truffles will elevate your dish to gourmet status.
-
Nutty Crunch: Add toasted pine nuts or walnuts for a delightful crunch. This unexpected twist introduces a satisfying texture that pairs beautifully with the creamy potatoes.
What to Serve with Crispy Potato Pave?
Indulge in the perfect dining experience by adding delightful accompaniments that elevate the richness of this buttery side dish.
-
Roasted Chicken: The juicy, savory flavors of roasted chicken complement the buttery layers beautifully, creating a comforting and satisfying meal.
-
Grilled Salmon: The light, flaky texture of grilled salmon balances the richness of the potato pave, creating a harmonious dish that feels upscale.
-
Cranberry Relish: This tangy, sweet relish cuts through the dish’s richness, adding a refreshing twist that brightens each bite.
-
Garlic Green Beans: Crisp-tender green beans sautéed in garlic provide a fresh and vibrant contrast to the crispy layers, enhancing the overall experience.
-
Mixed Green Salad: A light salad with a zesty vinaigrette adds a crunchy texture and balances out the softness of the pave, keeping things lively on the plate.
-
Red Wine: A glass of full-bodied red wine, like Cabernet Sauvignon, pairs wonderfully, deepening the flavors and bringing a touch of elegance to the meal.
Let the delicious combinations transport you to a cozy French bistro, ensuring every moment shared around the table is memorable!
Expert Tips for Crispy Potato Pave
-
Clarified Butter is Key: Using clarified butter is essential for achieving those crispy, buttery layers. Regular butter burns too quickly during cooking.
-
Dry Your Potatoes: Make sure your potato slices are thoroughly dried before layering. Excess moisture can lead to soggy layers instead of a delightful crisp.
-
Slicing Uniformly: Utilize a mandoline for uniform potato slices. This not only improves the final texture but also helps achieve that beautiful layered look.
-
Be Patient with Cooking: Resist the urge to flip or disturb the slices too soon in the pan. Let them brown properly to develop that signature crust.
-
Make-Ahead for Convenience: Prepare your Potato Pave a day in advance. Refrigerating overnight enhances the flavors and makes cutting much easier the next day.
-
Add a Flavor Twist: Experiment with optional herbs like thyme or rosemary between the layers for added depth in flavor.
How to Store and Freeze Potato Pave
Fridge: Store your Potato Pave in an airtight container for up to 5 days after baking. Allow it to cool completely before sealing to maintain freshness.
Freezer: Wrap individual slices in plastic wrap followed by aluminum foil, then freeze for up to 3 months. This keeps the crispy, buttery layers intact for future enjoyment.
Reheating: When ready to serve, reheat in a preheated oven at 375°F (190°C) for about 15-20 minutes until warmed through and crispy again. Avoid microwaving, as it can make the layers soggy.
Make-Ahead Tips: Preparing your Potato Pave in advance? Simply bake it, cool, refrigerate overnight, and reheat to enjoy those glorious crispy, buttery layers without the last-minute fuss!
Make Ahead Options
These Crispy Potato Pave are ideal for meal prep, allowing you to enjoy this elegant dish without a last-minute rush. You can prepare the layered potatoes up to 3 days in advance. Simply follow the recipe until the baking step, then let the packed layers cool and refrigerate them overnight (this helps them set firmly). When ready to serve, unmold and cut the pave, then sear each piece in butter until they’re golden brown and crispy. To maintain that delectable texture, ensure the potatoes are dried thoroughly after slicing and tightly cover them while refrigerating. With these make-ahead tips, you can save valuable time on busy evenings while still delighting your guests!
Crispy Potato Pave Recipe FAQs
What type of potatoes should I use for Potato Pave?
Absolutely! Yukon Gold potatoes are ideal due to their perfect balance of starch and moisture, providing crispy, buttery layers. If you prefer a different texture, you can substitute them with Russet potatoes.
How do I store leftover Potato Pave?
To keep your Potato Pave fresh, store it in an airtight container in the fridge for up to 5 days. Make sure it has cooled completely before sealing to maintain its delightful texture and flavor.
Can I freeze Potato Pave?
Yes, you can freeze Potato Pave! Wrap individual slices in plastic wrap followed by aluminum foil to prevent freezer burn, and store them for up to 3 months. When you’re ready to enjoy them, reheat in a preheated oven at 375°F (190°C) for about 15-20 minutes until crispy.
What should I do if my Potato Pave doesn’t turn out crispy?
If your Potato Pave lacks the desired crispiness, make sure to thoroughly dry the potato slices before layering them. Moisture can hinder the crisping process. Also, using clarified butter instead of regular butter is crucial, as the latter burns quickly. If all else fails, re-sear the pieces in a hot pan with a bit of butter to reinvigorate the crispy texture.
Are there any dietary considerations I should keep in mind?
Very! Potato Pave is naturally gluten-free unless breadcrumbs are added. However, if you or your guests have dairy allergies, you can use olive oil or duck fat as alternatives to clarified butter, though this might slightly change the crunch.
How do I slice potatoes for the best results?
To achieve uniform slices that create those beautiful layered effects, I recommend using a mandoline slicer. Aim for 1/16-inch rounds—this contributes to the overall cooking and texture of your Potato Pave, ensuring an even bake and delightful crunch.

Crispy, Buttery Layers: The Ultimate Potato Pave Recipe
Ingredients
Equipment
Method
- Preheat your oven to 325°F (160°C) and line a loaf pan with parchment paper.
- Peel and thinly slice Yukon Gold potatoes into 1/16-inch rounds, soaking them in cold water to prevent browning, then drying thoroughly.
- Layer the potato slices in the prepared pan, brushing each layer with clarified butter and sprinkling with salt and black pepper.
- Cover potatoes with parchment paper and aluminum foil, adding weights on top to compress.
- Bake for 1 hour 45 minutes to 2 hours until tender.
- Allow the Potato Pave to cool, then refrigerate overnight.
- Carefully unmold and cut into squares.
- Sear each piece in a hot nonstick pan with a little butter until golden and crispy.
- Serve warm, optionally garnished with fresh herbs or truffle oil.