
Spring has officially sprung, and there’s nothing like the joy of preparing festive treats to celebrate the season! I found myself daydreaming about the delightfulness of Easter as colorful decorations filled every aisle of the store. It was there, in the frenzy of pastel hues and sugary confections, that the idea for my Easter Dirt Cups blossomed. The incredible layers of Oreo crumbs, luscious pudding, and playful Peeps come together to create a whimsical dessert that not only looks fantastic but also tastes like a charming mix of nostalgia and fun.
Whether you’re a baking novice or a seasoned chef looking to escape the mundane fast-food routine, this easy-to-make recipe is perfect for engaging the whole family. Picture a light and fluffy pudding mingling with crunchy Oreo bits, vibrant green coconut, and delightful little chocolate eggs—the perfect combination for making memories. So, roll up your sleeves and let’s whip up these delicious Easter Dirt Cups that will have everyone smiling from ear to ear!

Why are Easter Dirt Cups a must-try?
Visual Appeal: The vibrant layers of color create an eye-catching presentation that is sure to impress.
Family Fun: Involve the kids in the decorating process for a collaborative and joyful experience!
Nostalgic Taste: Combining Oreo cookies with creamy pudding will take you back to childhood treats.
Simple Steps: With only a handful of ingredients and easy directions, this recipe is a breeze for all skill levels.
Crowd-Pleasing: Perfect for gatherings—guests of all ages will love this whimsical dessert!
These Easter Dirt Cups are the perfect addition to your spring celebrations. Grab the ingredients and get started today!
Easter Dirt Cups Ingredients
• Get ready to create these delightful Easter Dirt Cups with this simple list!
For the Pudding Mixture
- Oreo cookies – crush them finely to create a rich, chocolatey base for your cups.
- Cold milk – make sure it’s chilled for the best pudding texture.
- Instant cheesecake or white chocolate pudding mix – provides a sweet, creamy flavor that pairs perfectly with Oreos.
- Cool Whip – fold in gently for a light, fluffy texture that elevates the pudding.
For the Coconut Decoration
- Shredded coconut – this will be transformed into a delightful green grass-like topping.
- Gel food coloring – use any color you like to customize your dessert’s look.
- Green gel food coloring – specifically for dyeing the coconut to mimic fresh spring grass.
For the Toppings
- Peeps marshmallows – fun-shaped bunnies or chicks bring a playful element to your cups.
- Mini Cadbury eggs – a sweet finishing touch that adds a touch of chocolatey goodness.
With these ingredients on hand, you’re well on your way to bringing some festive cheer to your Easter celebrations! Happy cooking!
How to Make Easter Dirt Cups
-
Crush the Oreos: Add the Oreo cookies to a food processor and pulse until they form a fine crumb. This will be the delightful chocolate base for your cups—set these crumbs aside for later!
-
Mix the Pudding: In a large bowl, whisk together the cold milk and the pudding mix until fully combined. Allow it to chill in the fridge for about five minutes, then stir again to get the perfect creamy texture.
-
Fold in the Cool Whip: Gently fold the thawed Cool Whip into your thickened pudding mixture, creating a light and airy blend. This step adds that delightful fluffiness that everyone will love!
-
Color the Pudding: Divide the pudding mixture into two bowls. In one bowl, add two to three drops of your chosen gel food coloring and stir until evenly blended. Repeat with the second bowl using a different color.
-
Dye the Coconut: Place the shredded coconut into a zipper top bag, add two to three drops of green gel food coloring, seal the bag, and shake until the coconut is vibrantly green, resembling fresh spring grass.
-
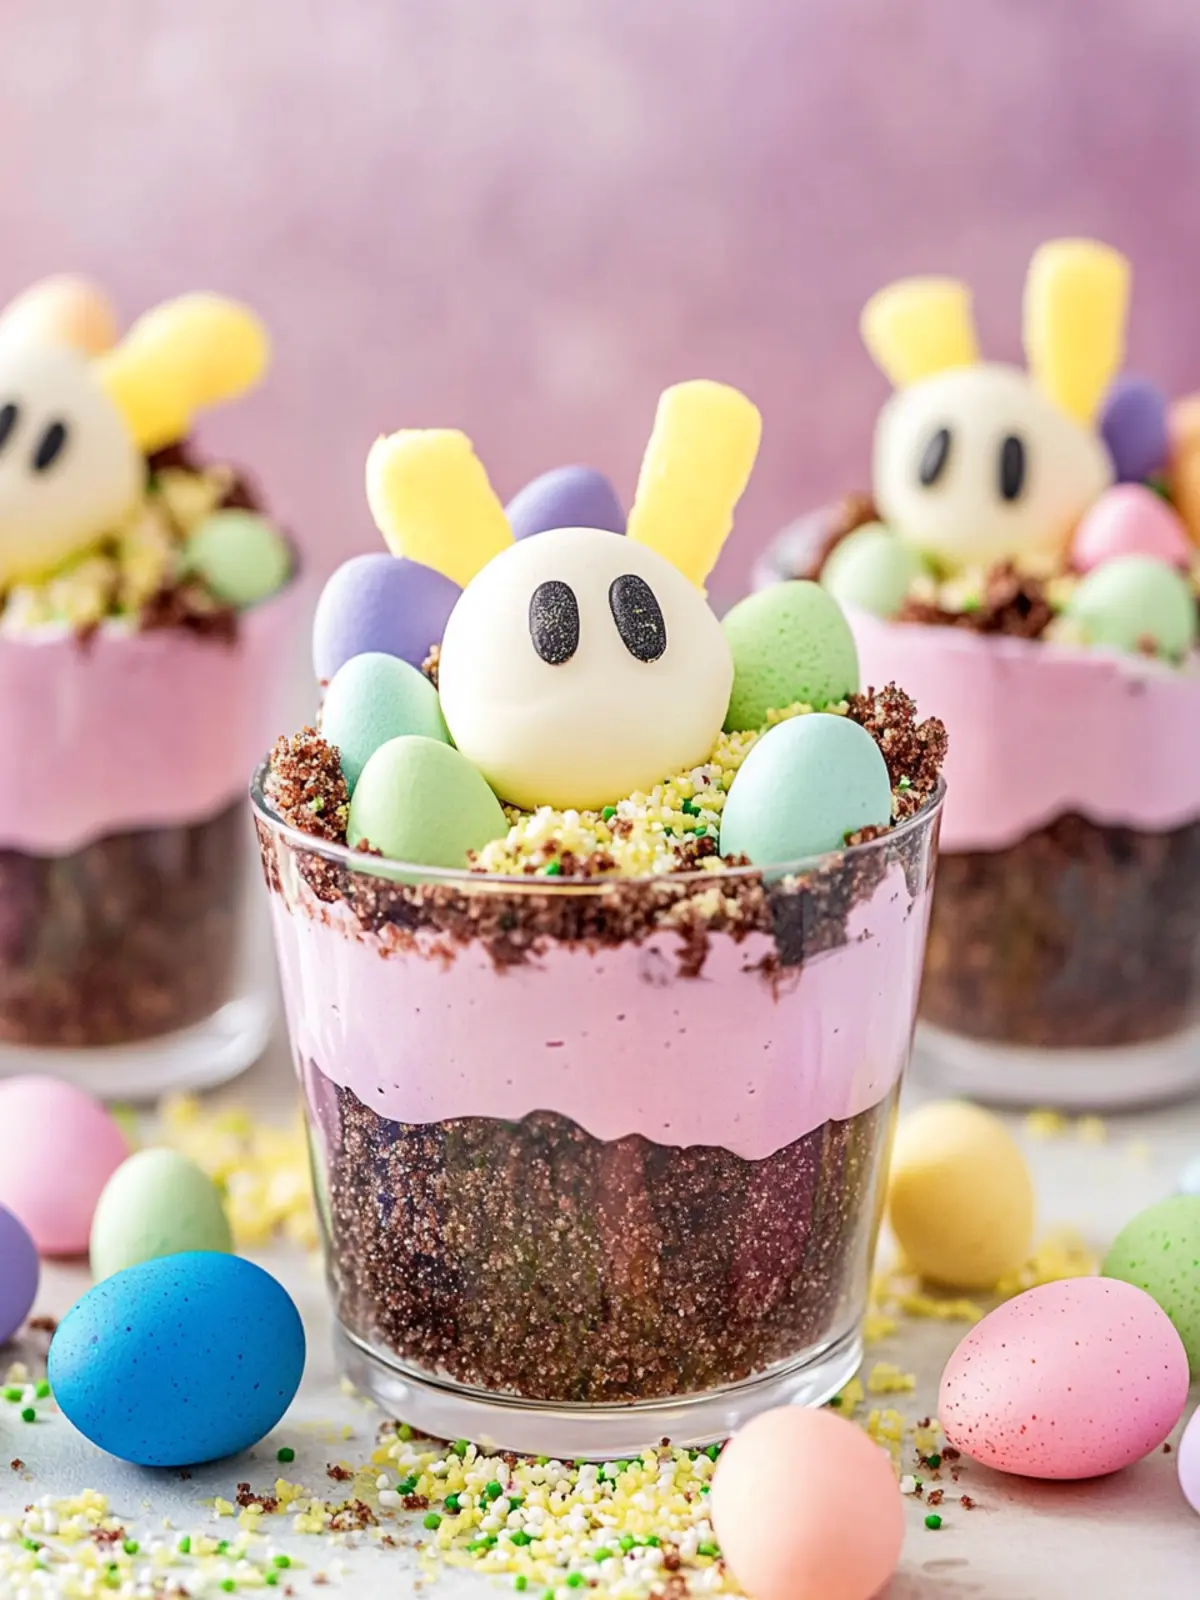
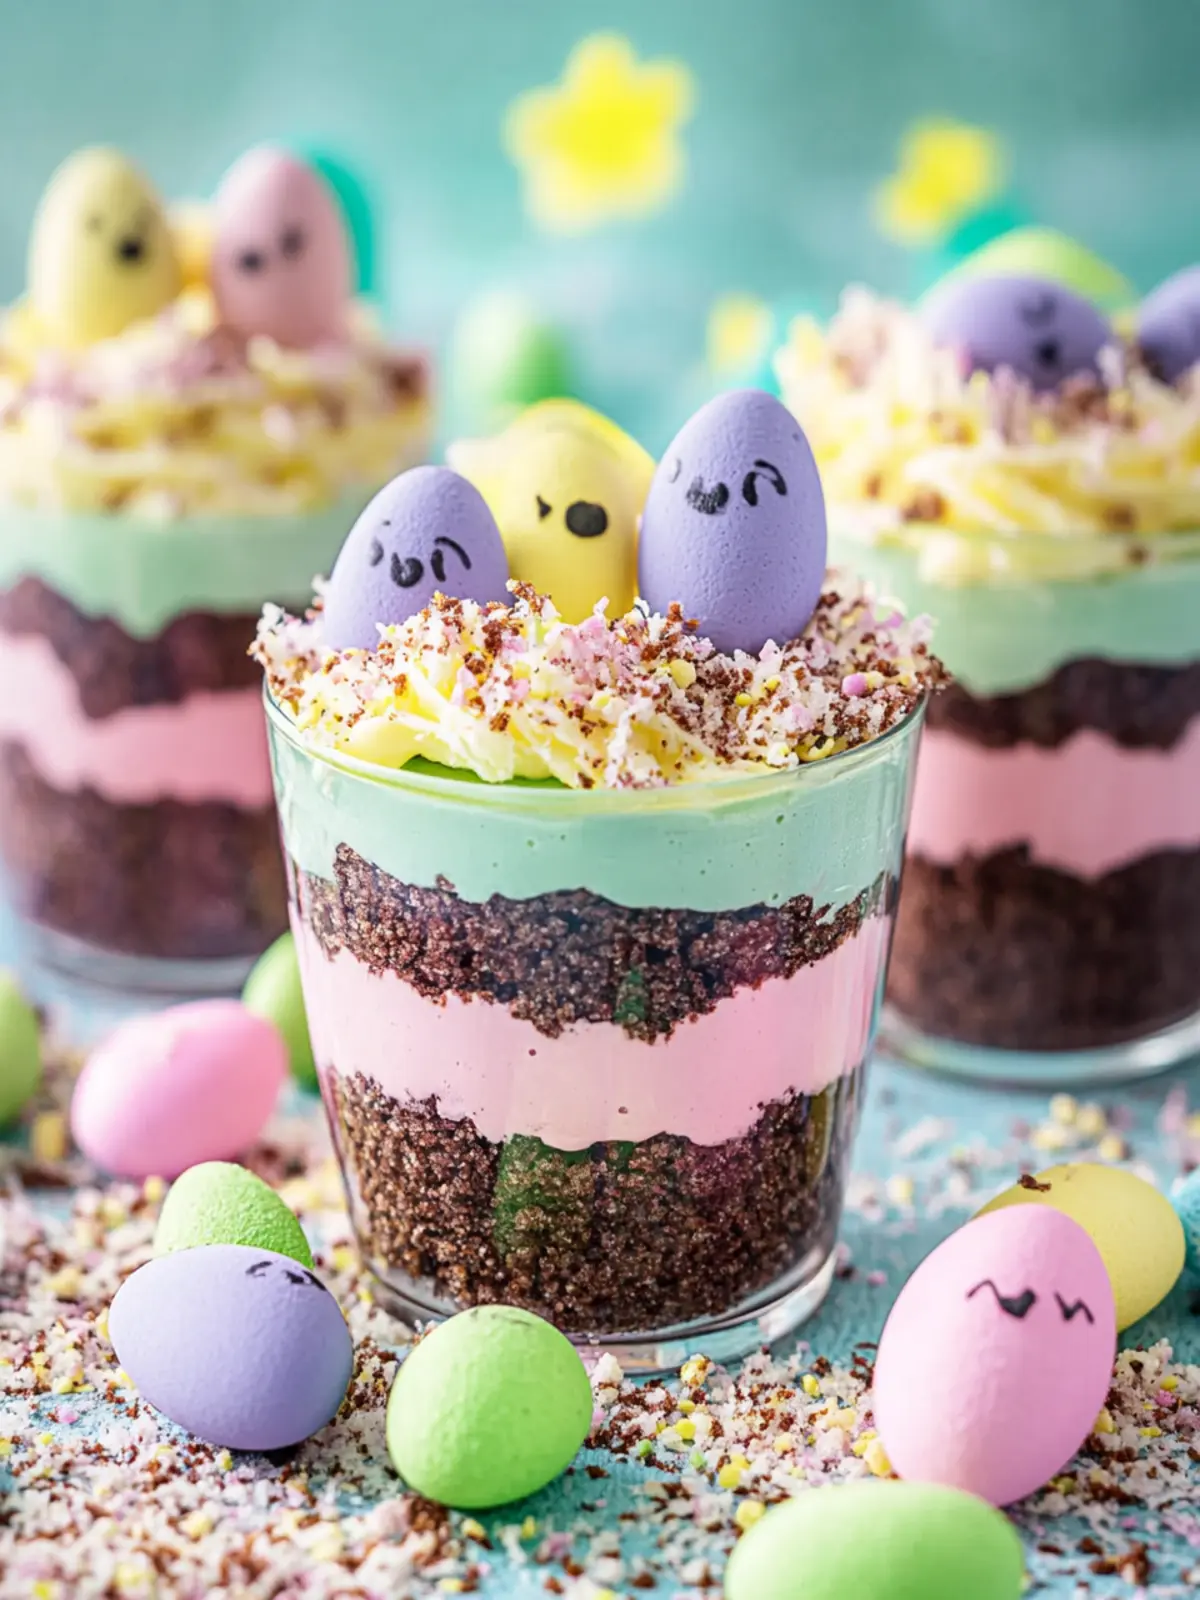
Layer the Cups: Start by adding two tablespoons of the processed Oreo crumbs to the bottom of each of your 10 cups. Follow with two tablespoons of one color of pudding, then add more Oreo crumbs, and repeat with two tablespoons of the second colored pudding. Finally, top with another layer of Oreo crumbs.
-
Add the Toppings: Sprinkle about one tablespoon of the green coconut over each cup until it’s fully covered. Finish off by placing a bunny Peep or chick marshmallow and a few mini Cadbury eggs on top for that perfect decorative touch.
-
Serve or Chill: Enjoy your gorgeous Easter Dirt Cups right away, or store them in the refrigerator until you’re ready to indulge!
Optional: Drizzle chocolate sauce over the topped cups for an extra treat!
Exact quantities are listed in the recipe card below.

Expert Tips for Easter Dirt Cups
-
Oreo Crumb Consistency: Ensure the Oreo crumbs are finely crushed for even layers. Larger chunks can disrupt the desired texture and layering.
-
Chill the Mixture: Allowing the pudding to set in the fridge is essential for achieving a thick consistency before folding in the Cool Whip.
-
Color Mixing: Start with a few drops of gel food coloring and add more as needed; this helps you achieve the perfect shade without overpowering the pudding flavor.
-
Coconut Shaking: When dyeing the shredded coconut, make sure the bag is sealed tightly to prevent any mess. Shake thoroughly for an even green color.
-
Decorating Fun: Let the kids help add the toppings! Personalize each cup with a unique arrangement of Peeps and mini Cadbury eggs for added fun.
-
Storing Tips: If making ahead, cover the cups with plastic wrap in the refrigerator to keep them fresh and avoid a soggy texture.
With these handy tips, your Easter Dirt Cups will be a delightful and colorful treat for everyone to enjoy!
Make Ahead Options
These delightful Easter Dirt Cups are perfect for make-ahead meal prep, making them an ideal choice for busy home cooks! You can prepare the pudding mixture—including the Oreo and Cool Whip layers—up to 24 hours in advance; simply store it in an airtight container in the refrigerator to keep it fresh and fluffy. The dyed coconut can also be made ahead and refrigerated for up to 3 days, ensuring it remains vibrant. When you’re ready to serve, layer the prepped components into cups and finish with Peeps and mini Cadbury eggs. With these steps, you’ll enjoy time-saving convenience without sacrificing taste!
How to Store and Freeze Easter Dirt Cups
Fridge: Store the Easter Dirt Cups in the refrigerator covered with plastic wrap or in an airtight container for up to 3 days to maintain freshness.
Freezer: Freezing is not recommended as the whipped topping may become watery upon thawing, affecting the texture.
Reheating: Serve the cups directly from the fridge without needing to reheat, as they are best enjoyed cold to enhance their delightful flavors.
Make-Ahead: If you plan to prepare them a day in advance, be sure to keep them chilled until serving to preserve their colorful layers and creamy texture.
What to Serve with Easter Dirt Cups?
Looking to create a delightful feast that pairs effortlessly with these charming treats?
-
Fresh Fruit Salad: A medley of vibrant seasonal fruits offers a refreshing contrast to the sweetness of the dirt cups, enhancing the lively spring theme.
-
Mini Quiches: Bite-sized quiches filled with spinach and cheese provide a savory balance that beautifully complements the flavors of your pudding dessert.
-
Veggie Platter: Crisp, colorful vegetables served with a dip add a satisfying crunch and healthiness to offset the sweetness, making it a balanced meal.
-
Chocolate Milkshakes: Creamy and rich, these indulgent beverages will satisfy any sweet tooth while echoing the chocolatey goodness of the dirt cups.
-
Lemonade Stand: A refreshing, zesty lemonade or a sparkling lemonade will cleanse the palate and add a cheerful, festive touch to your spring gathering.
-
Carrot Cake: Add to the Easter theme with a slice of moist carrot cake topped with cream cheese frosting for a dessert that nods to the season.
For a whimsical Easter party, these pairings will ensure a deliciously delightful experience that charms both kids and adults!
Easter Dirt Cups Variations
Feel free to add your personal twist to these delightful cups for even more fun and flavor!
-
Gluten-Free: Substitute gluten-free sandwich cookies for Oreos to accommodate gluten sensitivities without sacrificing taste.
-
Dairy-Free: Use almond or oat milk and a dairy-free whipped topping to create a version everyone can enjoy. The taste will still be satisfying and rich!
-
Flavor Boost: Add a splash of vanilla extract to the pudding mixture for a warm, inviting flavor that brings out the sweetness.
-
Texture Twist: Fold in mini marshmallows in between the layers for an added chewy texture that kids (and adults!) will love.
-
Fruit Addition: Layer in some chopped strawberries or blueberries to introduce a fresh and fruity element to your dessert. It lightens up the richness beautifully!
-
Chocolate Drizzle: Drizzle melted chocolate over the top for an indulgent touch that adds a nice contrast in flavor and an appealing finish.
-
Spicy Kick: Add a sprinkle of cinnamon or nutmeg into the pudding mixture for a warm, aromatic twist that surprises the palate.
-
Edible Flowers: Garnish your cups with edible flowers for an elegant touch. Not only do they look stunning, but they also bring a delicate flavor to each bite.
Each variation offers an opportunity to get creative while keeping the spirit of this fun dessert alive!
Easter Dirt Cups Recipe FAQs
How do I choose the right Oreos for my recipe?
Absolutely! For the best flavor and texture in your Easter Dirt Cups, select regular Oreos. Look for cookies that are firm and intact. Avoid any with dark spots or overexposed areas, as this indicates staleness. Feel free to experiment with seasonal Oreo flavors for a twist!
What’s the best way to store leftover Easter Dirt Cups?
Very simple! Store your Easter Dirt Cups in the refrigerator, making sure to cover them with plastic wrap or place them in an airtight container. They’ll stay fresh for up to 3 days. This way, they remain delicious and ready for you to enjoy whenever the craving strikes!
Can I freeze Easter Dirt Cups for later use?
No, I wouldn’t recommend freezing Easter Dirt Cups. The whipped topping (Cool Whip) can become grainy and watery when thawed, which could compromise that delightful fluffy texture. Instead, enjoy them fresh or prepare them the day before serving to save time!
What if my pudding doesn’t thicken properly?
No worries! If your pudding isn’t thickening after the initial chilling period, it could be due to not whisking it long enough or not allowing it enough time in the fridge. Simply let it chill for another 5-10 minutes and give it another good whisk. If it still seems too runny, consider adding a bit more pudding mix to help it set.
Are there any allergy considerations I should be aware of?
Absolutely! Check for allergies when serving these Easter Dirt Cups. They contain dairy, gluten, and could potentially include allergens depending upon specific ingredients like flavored Oreos. For a pet-friendly version, avoid giving this dessert to your dogs, as chocolate can be harmful to them. Always prioritize safety and enjoy with peace of mind!
Can I customize the colors used in this recipe?
Yes, the more the merrier! Feel free to get creative with the gel food coloring in your Easter Dirt Cups. If you prefer pastel colors, simply use fewer drops to achieve a soft hue. Don’t be afraid to mix shades or add different colors to match your event’s theme—it’s a fun way to personalize your dessert!
Easter Dirt Cups: A Fun and Colorful Dessert Delight
Ingredients
Equipment
Method
- Crush the Oreos: Add the Oreo cookies to a food processor and pulse until they form a fine crumb. Set these crumbs aside for later!
- Mix the Pudding: In a large bowl, whisk together the cold milk and the pudding mix until fully combined. Allow it to chill in the fridge for about five minutes, then stir again for the perfect creamy texture.
- Fold in the Cool Whip: Gently fold the thawed Cool Whip into your thickened pudding mixture, creating a light and airy blend.
- Color the Pudding: Divide the pudding mixture into two bowls. In one bowl, add two to three drops of your chosen gel food coloring. Repeat with the second bowl using a different color.
- Dye the Coconut: Place the shredded coconut into a zipper top bag, add two to three drops of green gel food coloring, seal the bag, and shake until the coconut is vibrantly green.
- Layer the Cups: Start by adding two tablespoons of the processed Oreo crumbs to the bottom of each of your cups. Follow with two tablespoons of one color of pudding, then another layer of Oreo crumbs, and repeat with the other colored pudding.
- Add the Toppings: Sprinkle about one tablespoon of the green coconut over each cup and finish off with a bunny Peep or chick marshmallow and a few mini Cadbury eggs.
- Serve or Chill: Enjoy your Easter Dirt Cups right away or store them in the refrigerator until you're ready to indulge!