When the sun starts to dip low in the sky and dinner time rolls around, I often crave something that feels both indulgent and fresh. That’s when my mind drifts to Easy Coconut Shrimp. The first crisp bite transports me to a sun-soaked beach, where the sweetness of coconut meets the savory crunch of golden shrimp. Each piece is a delightful reminder that homemade doesn’t have to mean complicated.
Imagine the joy of a quick, 10-minute recipe that brings all those tropical vibes right to your kitchen! You’ll find that with just a few simple steps, you can create this crowd-pleaser that’s perfect for any occasion—be it a cozy night in or a gathering with friends. And, paired with a dipping sauce that adds a hint of tartness and spice, it’s hard to believe something so elegant and delicious can be prepared so effortlessly. Let’s dive into this culinary treat and ignite your taste buds!

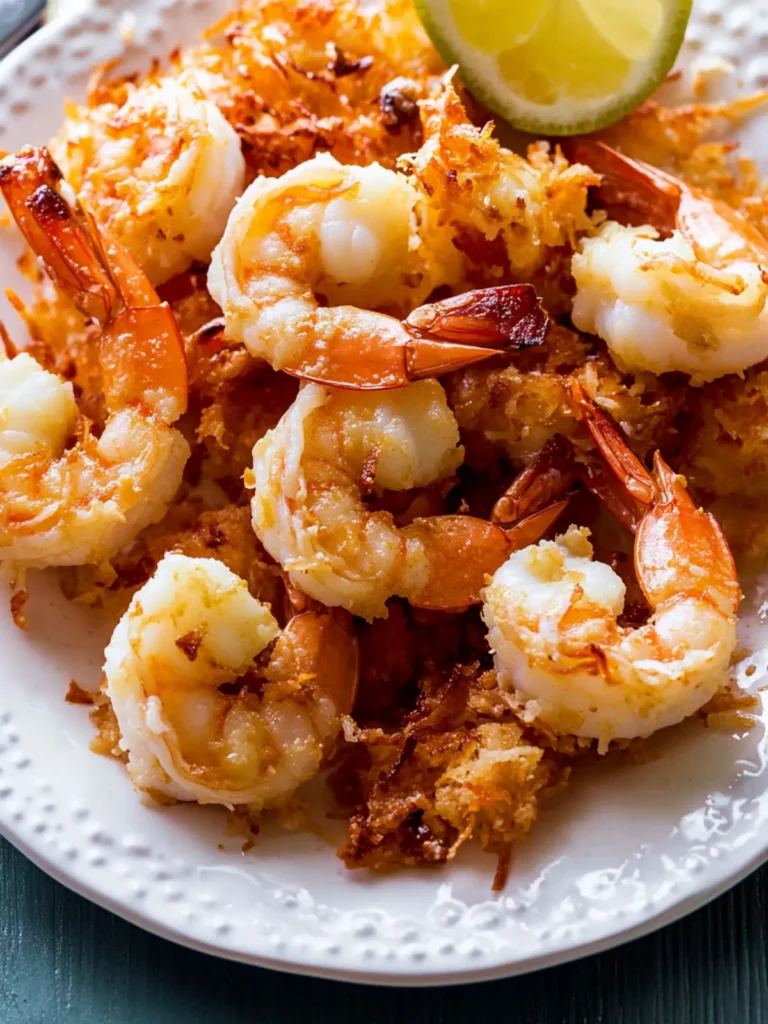
Why is Easy Coconut Shrimp a Must-Try?
Exquisite Flavor: The sweetened shredded coconut perfectly complements the tender shrimp, creating a deliciously unique taste that will leave you craving more.
Quick Preparation: With just a 10-minute cook time, this dish is a lifesaver on busy nights, proving that homemade meals can be swift and satisfying.
Crowd-Pleasing: Whether it’s a family dinner or a party appetizer, these crispy delights will have everyone coming back for seconds.
Versatile Delights: Enjoy these shrimp on their own, or pair them with a zesty dipping sauce—a great way to customize your experience!
Impressive Presentation: Their golden hue and colorful garnishes make them visually appealing, ensuring you’ll impress your guests with minimal effort.
Perfect for those who appreciate easy yet elevated flavors, try out this Easy Coconut Shrimp for a delightful meal that never disappoints!
Easy Coconut Shrimp Ingredients
Prepare to whisk up this delightful dish with just a few key items!
For the Coating
- All-purpose flour or whole wheat flour – Adds a perfect base for that crunchy coating.
- Salt – Enhances the overall flavor of the shrimp.
- Ground black pepper – Adds a hint of spice to balance the sweetness of the coconut.
- Large eggs – Helps the coating adhere beautifully to each shrimp.
- Panko bread crumbs – Provides an extra crunch, making your shrimp irresistibly crispy.
- Sweetened shredded coconut – Essential for that tropical flavor in your easy coconut shrimp!
For the Shrimp
- Raw large shrimp – Ensure they are peeled and deveined, with tails attached for that elegant presentation.
For Cooking
- Vegetable oil, coconut oil, or olive oil – Choose one for frying; each option offers its unique flavor profile.
For Topping (Optional)
- Finely chopped cilantro – A fresh garnish that adds a pop of color and flavor!
Serving Sauce (Optional)
- Thai chili sauce – Adds a delightful spicy kick to your dish.
- Orange, peach, or apricot jam – Provides a sweet and tangy complement to the shrimp, making it a perfect dip!
Gather these ingredients, and get ready to create a dish that will impress your family and friends alike!
How to Make Easy Coconut Shrimp
-
Mix Dry Ingredients: In a mixing bowl, combine the flour, salt, and pepper. This blend will create a flavorful base to coat your shrimp.
-
Prepare Eggs: Beat the large eggs in a separate bowl until well mixed. This will help the coating stick to the shrimp wonderfully.
-
Combine Panko and Coconut: In a third bowl, combine the Panko bread crumbs with sweetened shredded coconut. This mixture adds the delightful crunch we crave!
-
Coat the Shrimp: Dip each shrimp into the flour mixture, then the beaten eggs, and lastly, dredge in the coconut mixture. Press gently to ensure the coconut adheres nicely.
-
Set Aside: Arrange the coated shrimp on a plate as you continue coating the remaining shrimp. This keeps them organized and ready to fry!
-
Heat the Oil: Add enough oil to cover the bottom of a large skillet over medium heat. Allow it to warm up—look for shimmering oil as a cue.
-
Fry the Shrimp: Carefully place 7-8 shrimp at a time in the skillet. Fry them for 2 minutes, then flip and fry for another 2 minutes, until they turn golden brown and crispy.
-
Drain: Transfer the finished coconut shrimp to a plate lined with a paper towel. This helps absorb any excess oil for a delightful crunch!
-
Garnish: Sprinkle finely chopped cilantro on top for a fresh touch and beautiful presentation.
-
Prepare Dipping Sauce: Mix the Thai chili sauce with your choice of jam in a small bowl. This zesty dip perfectly complements the shrimp!
Optional: Serve the Easy Coconut Shrimp with lime wedges for an extra burst of flavor!
Exact quantities are listed in the recipe card below.

Easy Coconut Shrimp Variations
Feel free to explore these tempting twists to elevate your Easy Coconut Shrimp!
-
Gluten-Free: Use a gluten-free flour blend in place of all-purpose flour to enjoy this dish without any gluten concerns.
-
Spicy Kick: Add cayenne pepper or sriracha to the flour mixture for an extra layer of heat that will thrill your taste buds!
-
Coconut Flakes: Swap out sweetened shredded coconut for unsweetened flakes for a nuttier flavor and less sweetness if you prefer.
-
Herby Freshness: Toss in some herbs like parsley or dill with the coconut for an aromatic upgrade that brightens each bite.
-
Toasted Coconut: Try toasting the shredded coconut in a dry skillet before coating the shrimp—it enhances the flavor and adds a beautiful golden color!
-
Sweet & Savory: Combine coconut and crushed pineapple in the coating for a tropical blend that offers both sweetness and juicy texture in every crunch.
-
Asian Fusion: Incorporate sesame seeds into your Panko mixture for a delightful crunch and a subtle hint of nuttiness, giving your shrimp an Asian-inspired twist.
-
Oven-Baked: Instead of frying, bake the coated shrimp at 400°F (200°C) for about 12-15 minutes until crispy for a lighter option!
Dive into these delicious variations and make this Easy Coconut Shrimp fully your own!
Helpful Tricks for Easy Coconut Shrimp
Dry Ingredients Matter: Ensure your flour is well-mixed with salt and pepper; this enhances the shrimp’s flavor and prevents bland bites.
Eggs for Adhesion: Don’t skip the egg step! It’s crucial for ensuring the coconut coating sticks well to the shrimp, preventing it from falling off during frying.
Temperature Check: Keep the oil at medium heat. Too hot will burn the coating, while too cool will result in greasy shrimp. Aim for a shimmering surface!
Batch Frying: Fry in small batches to maintain oil temperature and get a perfectly crispy texture. Overcrowding the skillet can lead to soggy shrimp.
Crispy Finish: After frying, drain on paper towels immediately to keep them crispy and remove excess oil. This simple step makes all the difference!
Now you’re ready to master the art of preparing Easy Coconut Shrimp that’s sure to impress!
How to Store and Freeze Easy Coconut Shrimp
Fridge: Store leftover Easy Coconut Shrimp in an airtight container for up to 3 days to maintain freshness.
Freezer: For longer storage, freeze cooked shrimp by placing them in a single layer on a baking sheet, then transfer to a freezer-safe bag for up to 3 months.
Reheating: Reheat in the oven at 350°F (175°C) for about 10-15 minutes or until heated through to retain their crispy texture. Avoid microwaving as it can make them soggy.
Room Temperature: Do not leave shrimp out at room temperature for more than 2 hours to ensure food safety.
What to Serve with Easy Coconut Shrimp?
Round out your dining experience with delightful accompaniments that balance the flavors of your crispy coconut shrimp.
-
Coconut Rice: This fragrant side brings sweetness and complements the tropical theme, enhancing every bite of shrimp. Its creamy texture pairs wonderfully with the crunch of the shrimp, elevating your meal.
-
Mango Salsa: A fresh, zesty salsa brightens the dish with its vibrant flavors and adds a refreshing contrast to the richness of the shrimp. The combination of sweet mango and spicy jalapeños is a match made in heaven!
-
Green Salad: A simple mixed greens salad with a light vinaigrette adds a crispy, refreshing element to your meal. The tanginess of the dressing cuts through the richness of the shrimp, creating a well-balanced plate.
-
Coleslaw: A crunchy, citrusy coleslaw offers a delightful crunch and a burst of flavor. Pairing the crisp cabbage and dressing with your shrimp adds complexity to each bite.
-
Tropical Fruit Platter: Serve a platter of fresh tropical fruits like pineapple and papaya to enhance the island vibes. Their natural sweetness complements the shrimp beautifully, creating a colorful and inviting presentation.
-
Cucumber Mint Cooler: Pair your meal with a refreshing drink, like a cucumber mint cooler. This light, herbal beverage will cleanse your palate and keep you cool, echoing the tropical flavors on your plate.
With these delightful pairings, your Easy Coconut Shrimp will shine even brighter on the dining table!
Make Ahead Options
These Easy Coconut Shrimp are a fantastic choice for meal prep, making your busy evenings simpler! You can coat the shrimp up to 24 hours in advance and store them in the refrigerator (this keeps them fresh and prevents them from sticking together). To maintain their delightful crunch, place the coated shrimp in a single layer on a baking sheet, and cover tightly with plastic wrap. When you’re ready to cook, simply heat the oil and fry them for about 4-5 minutes until they’re golden brown. This way, you can enjoy restaurant-quality results with minimal effort during your hectic weeknight dinners!

Easy Coconut Shrimp Recipe FAQs
How do I choose the best shrimp for this recipe?
Absolutely! When selecting shrimp, look for large, raw shrimp that are firm and slightly translucent. Ensure they are odorless and free from dark spots or discoloration. For the best taste and texture, opt for shrimp that is sold frozen and thaw them under cold running water or overnight in the refrigerator before cooking.
What’s the best way to store leftover Easy Coconut Shrimp?
You’ll want to keep your leftover Easy Coconut Shrimp in an airtight container in the refrigerator. This will help them stay fresh for up to 3 days. Just ensure they are completely cooled before storing to prevent moisture from making them soggy.
Can I freeze Easy Coconut Shrimp?
Certainly! To freeze your cooked shrimp, first place them in a single layer on a baking sheet lined with parchment paper. Freeze them for about 1-2 hours until firm. Then, transfer the shrimp to a freezer-safe bag, label it, and they will stay good for up to 3 months. When you’re ready to enjoy, reheat them in the oven to bring back that crispness—simply preheat your oven to 350°F (175°C) and warm them for 10-15 minutes.
What should I do if my coating is falling off during frying?
Very good question! If your coating seems to be falling off, double-check your dredging process—ensure you coat the shrimp thoroughly in the flour, then the egg, and finally, the Panko-coconut mixture with gentle pressure to adhere. Additionally, make sure the oil is hot enough; the right temperature helps the coating set quickly, preventing it from sliding off.
Are there any dietary considerations I should be aware of?
Definitely! If you’re hosting guests with dietary restrictions, keep in mind that shrimp is a common allergen. For those avoiding gluten, substitute the all-purpose flour with a gluten-free alternative and use gluten-free Panko bread crumbs. If someone has a coconut allergy, you could try using cornmeal or crushed nuts instead of shredded coconut for a different yet tasty crust.
How long can I leave leftover shrimp at room temperature?
It’s important to prioritize food safety! Do not leave your shrimp out at room temperature for more than 2 hours. If it’s a warm day, aim to bring that timeframe down to about 1 hour to ensure everyone enjoys this delicious dish safely.

Crispy Easy Coconut Shrimp That Will Wow Your Taste Buds
Ingredients
Equipment
Method
- In a mixing bowl, combine the flour, salt, and pepper.
- Beat the large eggs in a separate bowl until well mixed.
- In a third bowl, combine Panko bread crumbs with sweetened shredded coconut.
- Dip each shrimp into the flour mixture, then the beaten eggs, and lastly, dredge in the coconut mixture.
- Arrange the coated shrimp on a plate as you continue coating the remaining shrimp.
- Add enough oil to cover the bottom of a large skillet over medium heat. Allow it to warm up.
- Carefully place 7-8 shrimp at a time in the skillet. Fry for 2 minutes, then flip and fry for another 2 minutes.
- Transfer the finished coconut shrimp to a plate lined with a paper towel.
- Sprinkle finely chopped cilantro on top for a fresh touch.
- Mix the Thai chili sauce with your choice of jam in a small bowl.