
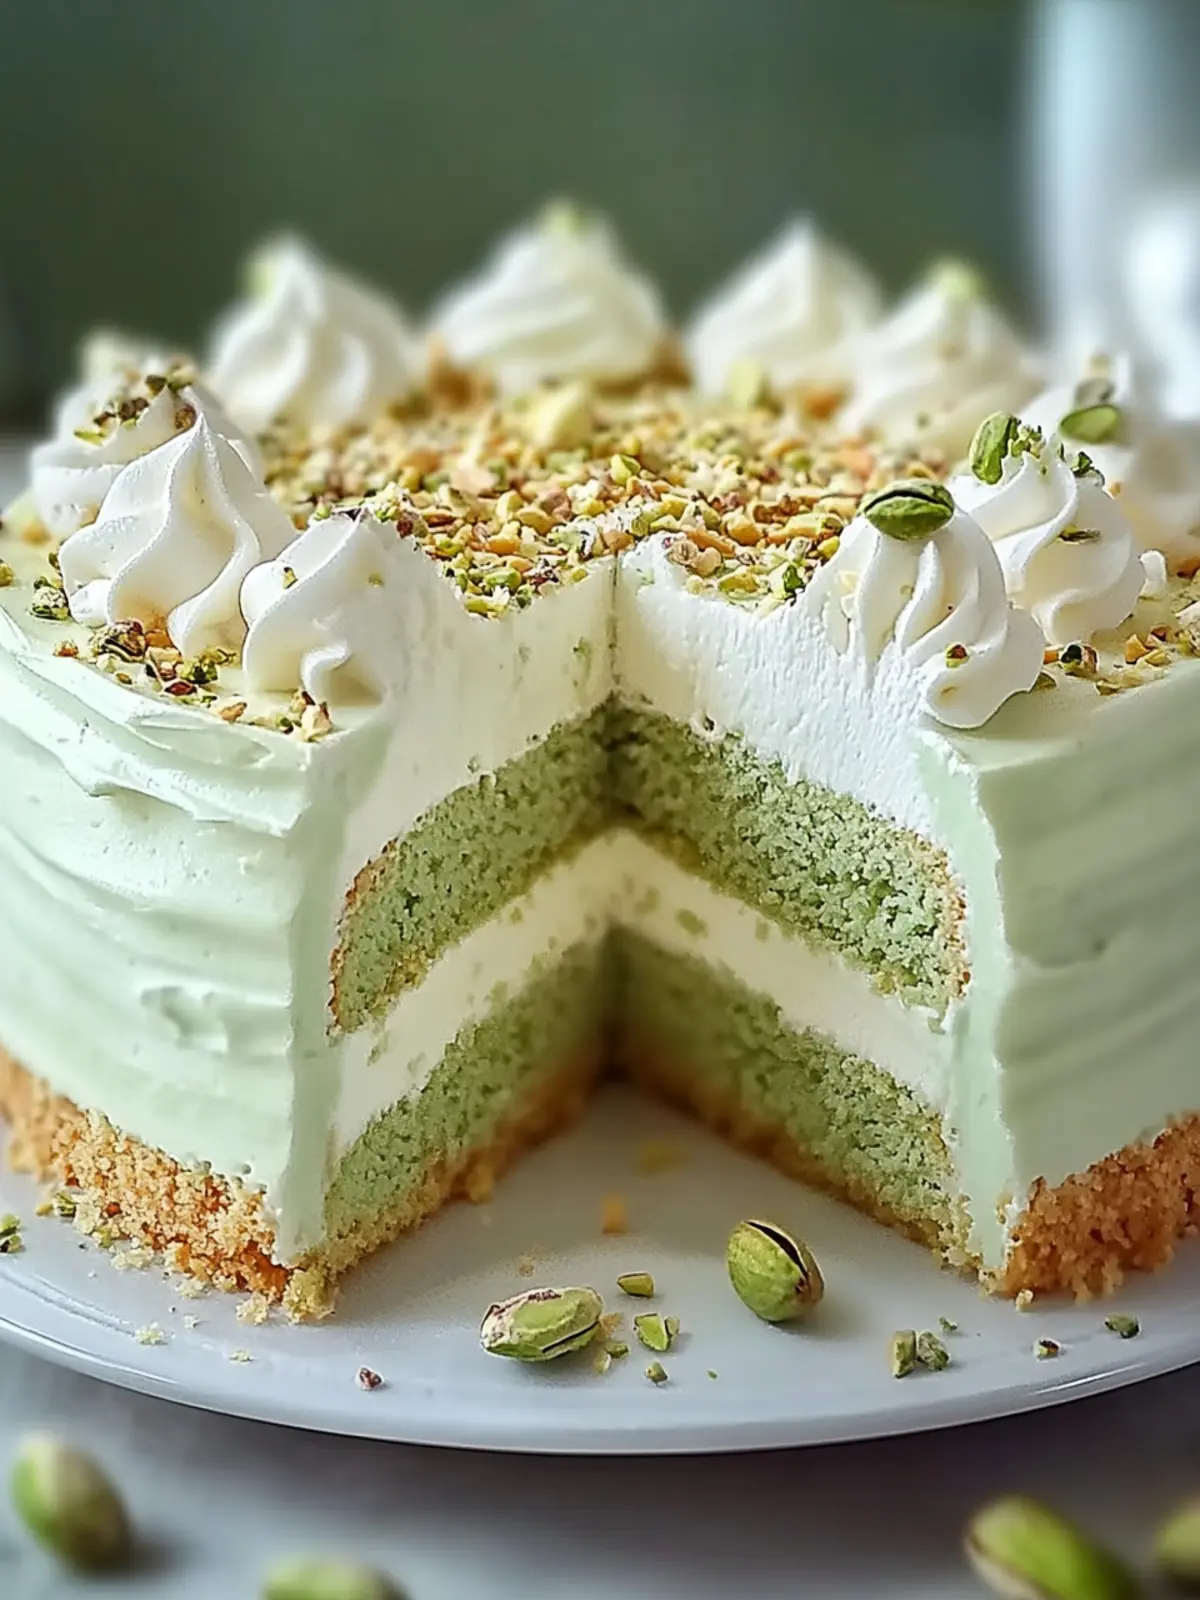
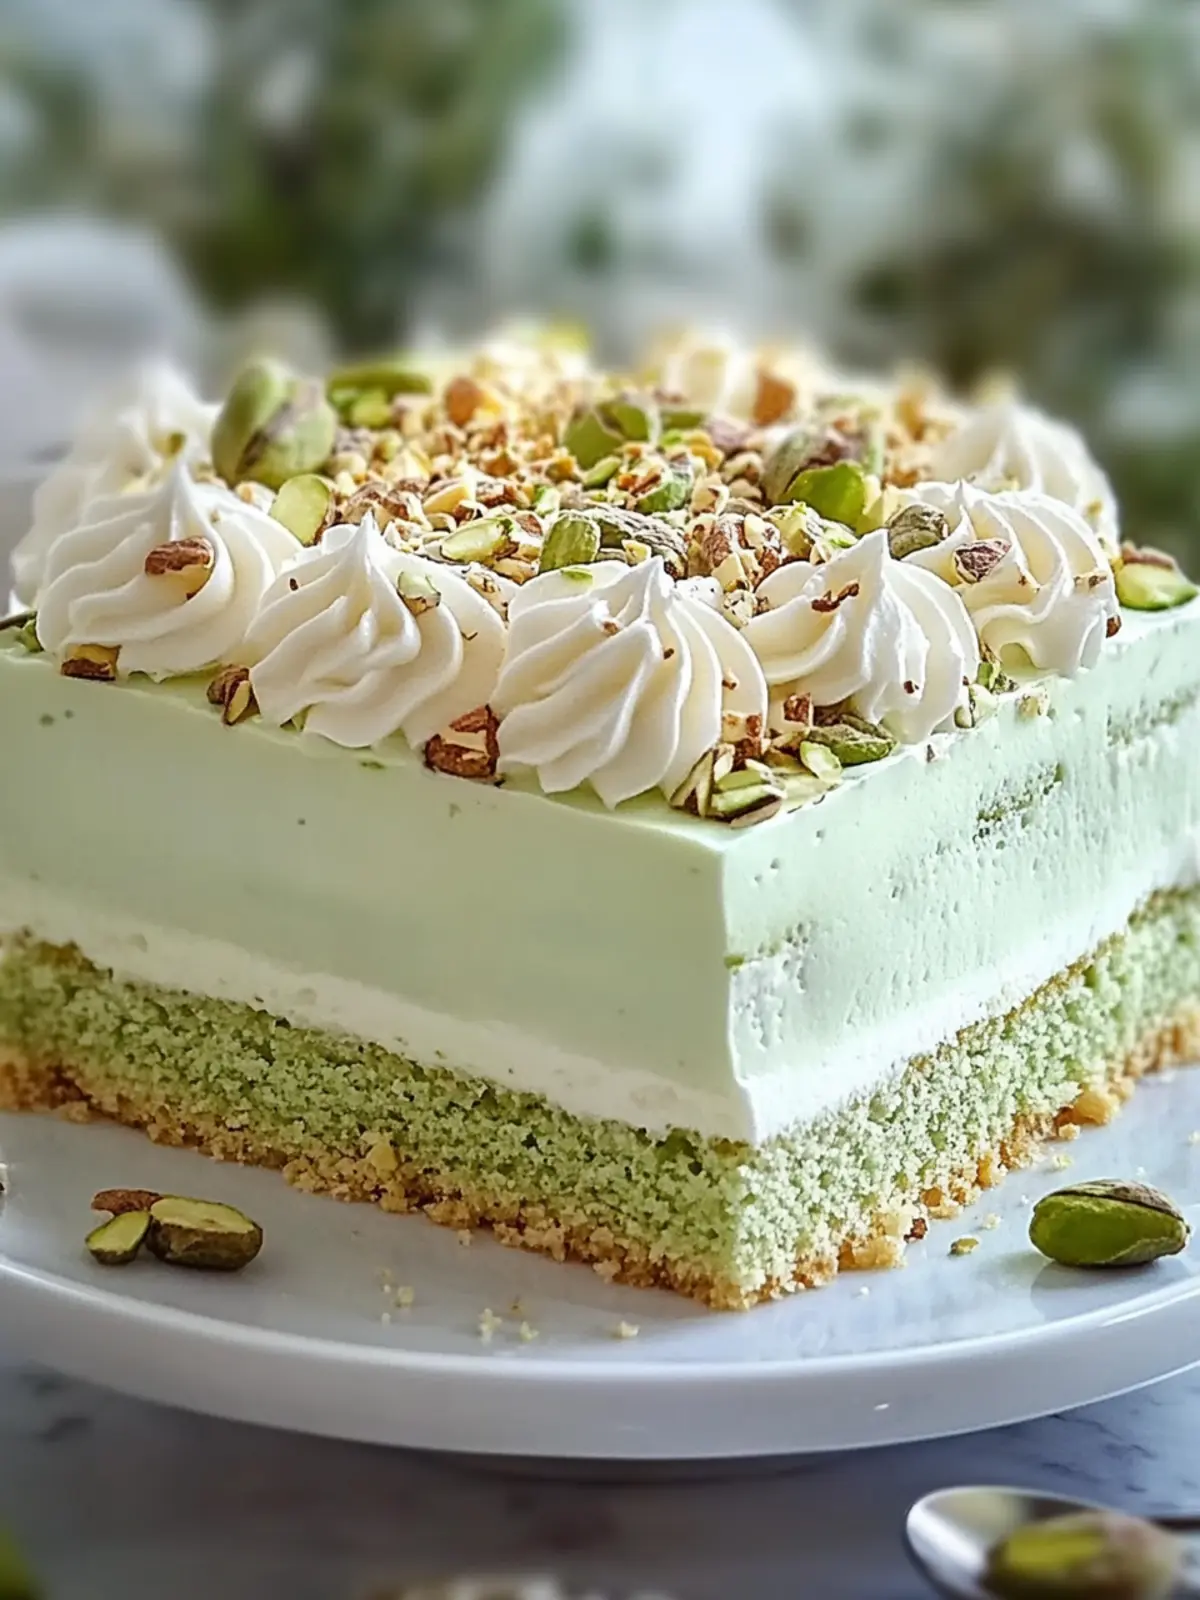
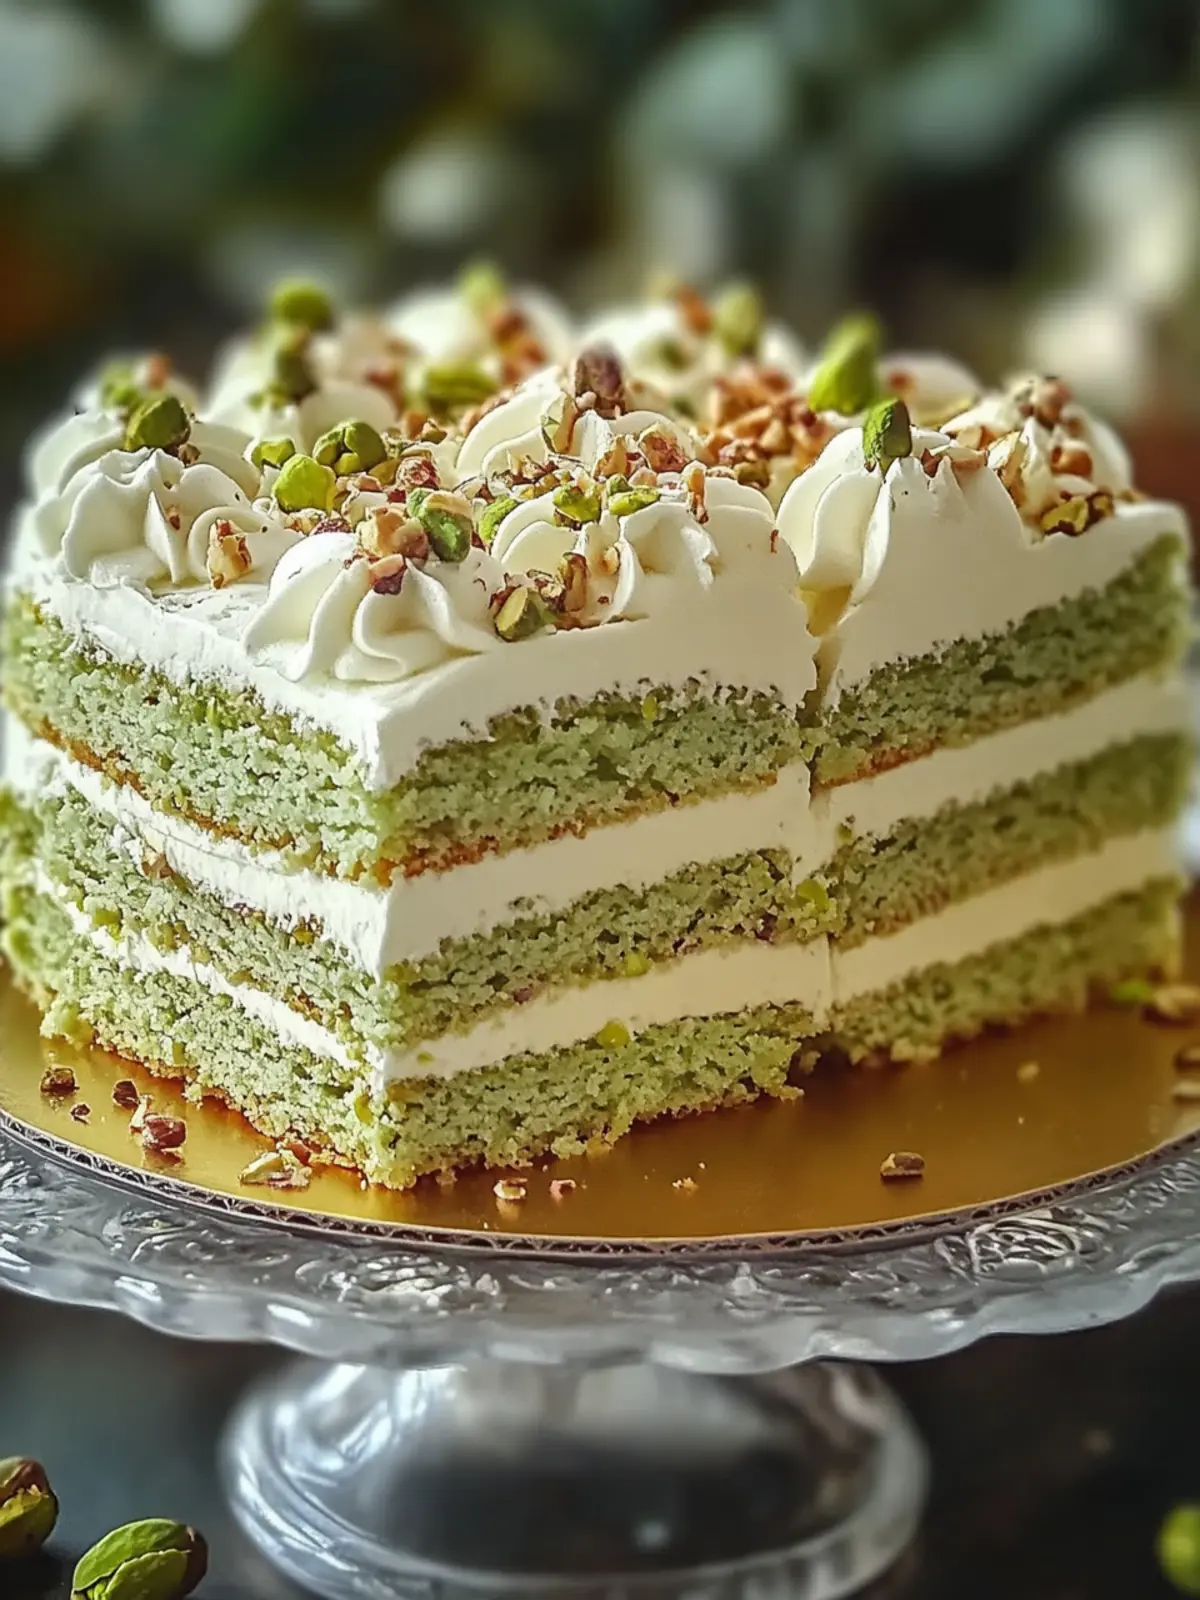
Imagine the moment when you slice into a Pistachio Dacquoise Cake, where the air fills with a delightful nutty aroma that dances playfully with hints of vanilla. It’s a dessert that combines the comforting nostalgia of home baking with an elegant twist, making it perfect for everything from casual gatherings to festive celebrations. I never expected a simple combination of egg whites, finely ground pistachios, and a touch of powdered sugar could yield such a sophisticated cake, yet here we are, delighting in its light, airy layers.
After an ordinary day of mundane meals and fast-food runs, this cake beckoned with the promise of indulgence—a solution to my craving for something special. As each bite melts away, the rich buttercream filling teases the palate, leaving you longing for just one more slice. Trust me, the only challenge you’ll face is deciding whether to share it or savor it all to yourself. Ready to create your own Pistachio Dacquoise Cake bliss? Let’s dive in!

Why is Pistachio Dacquoise Cake so special?
Indulgence Awaits: This cake is an exquisite treat that brings a sense of luxury to your dessert table.
Gluten-Free Option: For those with dietary restrictions, simply swap in gluten-free flour without sacrificing flavor.
Eye-Catching Presentation: Those beautiful layers of meringue and buttercream will impress your guests and elevate any occasion.
Effortlessly Elegant: Despite its refined look, the recipe is easy enough for bakers of all levels—perfect for both casual bakers and seasoned chefs.
Versatile Flavors: Feel free to experiment with fruit toppings or even a splash of almond extract to make it uniquely yours!
This cake isn’t just a dessert—it’s a delightful experience that delights at every celebration.
Pistachio Dacquoise Cake Ingredients
• To recreate this heavenly Pistachio Dacquoise Cake bliss, gather these essential ingredients!
For the Cake Layers
- Pistachios – Finely ground for structure and nutty flavor. Substitution: Almonds can be used for a different flavor profile.
- Powdered Sugar – Provides sweetness and a fine texture. No direct substitutes recommended for this role.
- Cake Flour – Offers a delicate structure to the cake layers. Substitution: Use a gluten-free cake flour blend to make the recipe gluten-free.
- Egg Whites – Key for creating a fluffy meringue. Note: Ensure they are at room temperature for best whipping results.
- Granulated Sugar – Adds sweetness to the meringue. No substitutions suggested.
For the Buttercream Filling
- Egg Yolks – Enrich the buttercream filling and add richness. No substitutions suggested.
- Unsalted Butter – Creates a creamy buttercream texture. Substitution: Dairy-free butter can be used for a vegan option.
- Vanilla Extract – Enhances the flavor of the buttercream. Substitution: Almond extract can be used for a different flavor.
- Pistachio Paste – Adds depth to the buttercream with concentrated pistachio flavor. Homemade pistachio paste can be made or replaced with additional ground pistachios if unavailable.
For the Syrup
- Sugar (for syrup) – Necessary for making a sweet syrup. No substitutions suggested.
- Water (for syrup) – Used in conjunction with sugar to create syrup. No substitutions suggested.
How to Make Pistachio Dacquoise Cake
-
Preheat Oven: Start by preheating your oven to 465°F (240°C). Meanwhile, line a baking sheet with parchment paper and place 7-inch pastry rings on top, ready for the batter.
-
Prepare Pistachio Mixture: In a food processor, finely pulse your pistachios. Combine them with powdered sugar and cake flour in a mixing bowl, ensuring an even mix for the cake’s base.
-
Whip Egg Whites: In a stand mixer, whip the egg whites until they become foamy. Gradually add in the granulated sugar while continuing to whip until you achieve stiff peaks that hold their shape beautifully.
-
Incorporate Dry Ingredients: Gently fold the prepared pistachio mixture into the whipped meringue. Do this in two additions, being careful not to deflate the airy texture you’ve created.
-
Bake: Spoon the batter into the prepared pastry rings. Bake at 350°F (180°C) for about 15 minutes or until the edges are golden and a skewer inserted comes out clean.
-
Cool: Once baked, turn off the oven and let the dacquoise layers cool inside for 1 hour, ensuring they maintain their delicate structure.
-
Prepare Filling: While the cake cools, beat the egg yolks in a bowl. In a saucepan, prepare the syrup by heating sugar and water until it reaches 240°F (115°C).
-
Combine Syrup and Yolks: Gradually mix the hot syrup into the egg yolks while whisking continuously. Then, fold in room temperature butter, vanilla extract, and pistachio paste until you achieve a creamy filling.
-
Assemble: Once cooled, carefully layer the dacquoise rounds with the rich buttercream filling to create an elegant cake, assembly-to-perfection!
Optional: Garnish with crushed pistachios for a delightful finishing touch!
Exact quantities are listed in the recipe card below.
What to Serve with Pistachio Dacquoise Cake?
Elevate your dessert experience with delightful pairings that will complement the airy elegance of this captivating cake.
- Fresh Berries: The tartness of raspberries or strawberries brightens each bite, balancing the nutty sweetness of the cake.
- Coffee or Espresso: A warm cup enhances the flavors, introducing rich, bold notes that amplify the cake’s charm.
- Whipped Cream: Lightly sweetened whipped cream adds a fluffy texture that complements the creamy buttercream beautifully.
- Chocolate Ganache: A drizzle of rich chocolate ganache creates an indulgent contrast, adding depth and a hint of bitterness.
- Peach or Apricot Compote: This fruity addition adds a lovely sweetness that pairs wonderfully with the nutty layers, for a summer vibe.
- Vanilla Ice Cream: A scoop of creamy vanilla ice cream brings a deliciously cool touch, perfect for a decadent dessert experience.
Consider enjoying your Pistachio Dacquoise Cake alongside a glass of sweet dessert wine, such as Moscato, to raise your gastronomic adventure to the next level!
Pistachio Dacquoise Cake Variations & Substitutions
Feel free to explore your culinary creativity with this recipe and make it uniquely yours!
- Nutty Twist: Replace pistachios with hazelnuts for a rich flavor and an equally beautiful texture.
- Fruit Infusion: Add finely chopped fresh strawberries or raspberries to the buttercream for a fruity burst in every bite.
- Chocolate Drizzle: Swirl melted dark chocolate into the buttercream for an indulgent chocolate-pistachio pairing.
- Vegan Option: Swap dairy butter for coconut oil and ensure to use a plant-based milk to create both the cake and filling.
- Aromatic Spice: Enhance the flavor with a dash of cardamom in the meringue, giving it an exotic twist that’s sure to impress.
- Citrus Zest: Add lemon or orange zest to the buttercream for a zesty kick that refreshes each bite.
- Coconut Flavor: Mix in shredded coconut with the pistachio paste to bring a tropical flair to your buttercream.
- Sweet Heat: Incorporate a pinch of cayenne pepper or chili powder into the dry ingredients for a surprising, spicy finish.
Each variation offers delightful twists, inviting you to savor even more of this indulgent cake!
Storage Tips for Pistachio Dacquoise Cake
Room Temperature: Keep the cake at room temperature for up to 1 day. Make sure to cover it lightly with a clean kitchen towel to avoid drying out.
Fridge: Store in an airtight container in the refrigerator for 2-3 days. This helps to maintain the cake’s delicate texture and flavors while keeping it fresh.
Freezer: For longer storage, freeze individual layers wrapped tightly in plastic wrap for up to 2 months. Thaw in the refrigerator before assembling your Pistachio Dacquoise Cake.
Reheating: If desired, let the cake come to room temperature after thawing for the best texture before serving again. Enjoy those delicious layers fresh!
Make Ahead Options
These Pistachio Dacquoise Cake layers are perfect for meal prep enthusiasts seeking to save time during busy weeks! You can prepare the meringue layers up to 24 hours in advance, simply bake them as directed and allow to cool completely before storing. Wrap each layer in plastic wrap and refrigerate to maintain their airiness. The buttercream filling can also be made ahead of time and stored in the fridge for up to 3 days—just re-whip it before using to bring back its creamy texture. When ready to assemble, layer the cool dacquoise rounds with the buttercream filling, and enjoy a stunning dessert that’s just as delicious as if made fresh that day!
Expert Tips for Pistachio Dacquoise Cake
• Room Temperature Whites: Always start with room temperature egg whites for the best meringue; cold egg whites won’t whip up as effectively.
• Gentle Folding: When incorporating the pistachio mixture, fold gently to retain the airiness of the meringue. Over-mixing can lead to a dense cake.
• Cooling Crucial: Let the cake layers cool in the oven to maintain their structure; this prevents them from collapsing when removed.
• Syrup Temperature: Ensure the sugar and water mixture reaches 240°F (115°C) before adding to the yolks, as this helps create a luscious buttercream.
• Storage Solutions: Store any leftover Pistachio Dacquoise Cake in an airtight container in the fridge for 2-3 days, keeping it fresh and delightful!
Pistachio Dacquoise Cake Recipe FAQs
How do I select ripe pistachios for this recipe?
Absolutely! When selecting pistachios, look for those in shells that are mostly closed and check the color; vibrant green indicates freshness. If you’re opting for pre-ground pistachios, ensure they are free from dark spots, as this could signify staleness.
What is the best way to store the Pistachio Dacquoise Cake?
Very! For optimal freshness, store your Dacquoise in an airtight container in the fridge for up to 2-3 days. You can keep it at room temperature for up to 1 day if you’re serving it soon. Just make sure to cover it loosely with a clean kitchen towel to prevent it from drying out.
Can I freeze the Pistachio Dacquoise Cake?
Absolutely! To freeze, wrap each layer individually in plastic wrap or parchment paper, then place them in a freezer-safe bag. They can be stored for up to 2 months. When ready to enjoy, thaw them in the fridge overnight before assembling your cake.
What should I do if my meringue doesn’t achieve stiff peaks?
Don’t worry! If your meringue isn’t forming stiff peaks, check that your mixing bowl and beaters are grease-free, as any fat can hinder the egg whites from whipping properly. Ensure that you’re using room temperature egg whites, and if you need a boost, add a pinch of cream of tartar while beating.
Is the Pistachio Dacquoise Cake safe for pets?
It’s essential to note that while pistachios are not toxic to pets, the sugar and butter in the cake are not suitable for them. It’s best to keep this delightful dessert for human enjoyment only!
Can I substitute any ingredients for dietary restrictions?
Yes, indeed! If you need a gluten-free option, simply use a gluten-free cake flour blend in place of traditional cake flour. For a vegan alternative, you can swap out the butter for a dairy-free variety and replace the egg yolks with a suitable egg replacer, keeping in mind that the buttercream texture may vary slightly.
Pistachio Dacquoise Cake Bliss: A Sweet Slice of Heaven
Ingredients
Equipment
Method
- Preheat your oven to 465°F (240°C) and line a baking sheet with parchment paper. Place 7-inch pastry rings on top.
- In a food processor, finely pulse the pistachios. Combine with powdered sugar and cake flour in a mixing bowl.
- In a stand mixer, whip the egg whites until foamy. Gradually add granulated sugar while continuing to whip until stiff peaks form.
- Gently fold the pistachio mixture into the whipped meringue in two additions.
- Spoon the batter into prepared pastry rings and bake at 350°F (180°C) for about 15 minutes.
- Turn off the oven and let the dacquoise layers cool inside for 1 hour.
- While cooling, beat the egg yolks and make the syrup by heating sugar and water to 240°F (115°C).
- Gradually mix the hot syrup into egg yolks and fold in room temperature butter, vanilla, and pistachio paste.
- Layer the dacquoise rounds with the buttercream filling to assemble the cake.