
There’s something irresistibly comforting about cooking a meal that combines nostalgia with your own personal twist, and that’s exactly what Chicken Onigiri offers. Picture this: the sound of warm rice sizzling in your pan, a rich, sweet aroma of teriyaki chicken filling your kitchen, and the satisfaction of crafting beautiful, bite-sized treats that please both the eyes and the palate. When I first decided to make onigiri at home, I was pleasantly surprised to discover how simple yet rewarding it could be.
As I stood in my kitchen, ready to ditch fast food for something homemade, I thought about how versatile onigiri can be. With just a handful of ingredients, you can whip up a dish that’s perfect for a cozy dinner, a packed lunch, or even an impromptu gathering with friends. Adding teriyaki chicken elevates this Japanese classic to a whole new level, turning an already delightful rice ball into a flavor-packed delight that everyone will love. Join me as we delve into this delightful recipe that promises to become a staple in your culinary repertoire!

Why is Chicken Onigiri a Must-Try?
Irresistible flavor: The sweet and savory teriyaki chicken perfectly complements the seasoned sushi rice, creating a taste explosion.
Quick prep: With just 35 minutes of prep time, you can create an impressive dish that’s ready in under an hour!
Versatile treat: Ideal for lunchboxes, picnics, or a cozy dinner, Chicken Onigiri fits any occasion.
Crowd-pleaser: Friends and family will adore this unique twist on a classic—perfect for gatherings!
Customizable fillings: Get creative! Substitute chicken with veggies or other proteins for a personalized touch.
This recipe truly stands out as a delicious alternative to fast food and offers a wholesome, homemade experience!
Chicken Onigiri Ingredients
For the Rice
• 4 cups cooked sushi rice – This is the base of your onigiri, providing that delightful sticky texture.
• ½ teaspoon salt – Adds flavor to the rice; don’t skip this for the best taste!
• 2 tablespoons furikake (optional) – Adds a burst of umami flavor and a fun texture to your rice.
For the Teriyaki Chicken
• ½ pound boneless skinless chicken meat – Lean protein that marinates beautifully in teriyaki sauce.
• 2 teaspoons soy sauce – Essential for seasoning and depth in the marinade.
• 1 tablespoon sake (or water) – Helps tenderize the chicken; use water if you want to keep it alcohol-free.
• ¼ teaspoon baking soda – This can help keep the chicken tender during cooking!
• 1 teaspoon cornstarch – Aids in thickening the teriyaki glaze for a satisfying finish.
• 1 ½ tablespoons soy sauce – Creates the rich teriyaki flavor profile you’ll love.
• 1 tablespoon mirin – Adds sweetness and a hint of complexity to the sauce.
• 1 tablespoon brown sugar (firmly packed) – Sweetens the sauce, enhancing the savory elements.
• 1 tablespoon oil – Use a neutral oil for cooking the chicken and prevent sticking.
• 1 tablespoon minced garlic – Adds aromatic flavor that brightens up the dish.
For Assembly
• 1 sheet nori (cut into small rectangles) – This traditional wrapping adds texture and a delicious contrast to the rice.
With these Chicken Onigiri ingredients, you’re all set to create a dish bursting with flavor and homemade goodness! Enjoy the process and savor the results!
How to Make Chicken Onigiri
-
Prepare the Rice: In a large bowl, combine your cooked sushi rice with ½ teaspoon of salt and the optional 2 tablespoons of furikake. Mix gently until the ingredients are well incorporated and set aside to cool slightly.
-
Marinate the Chicken: Cut the boneless skinless chicken meat into small pieces and place them in a bowl. Add 2 teaspoons of soy sauce, 1 tablespoon of sake (or water), ¼ teaspoon of baking soda, and 1 teaspoon of cornstarch. Mix until everything is thoroughly coated, then refrigerate for 30 minutes to let the flavors meld.
-
Mix the Teriyaki Sauce: In a small bowl, whisk together 1 ½ tablespoons of soy sauce, 1 tablespoon of mirin, and 1 tablespoon of brown sugar until fully combined. This will be your delicious teriyaki sauce.
-
Cook the Chicken: Heat 1 tablespoon of oil in a large nonstick pan over medium-high heat. Once hot, add the marinated chicken and cook for about 2-3 minutes until cooked through and no longer pink in the center.
-
Add Garlic and Sauce: Lower the heat to medium and stir in the minced garlic, cooking for about 30 seconds until fragrant. Then, pour in your teriyaki sauce mixture and continue to cook until the sauce thickens into a glaze, stirring frequently. Remove from heat.
-
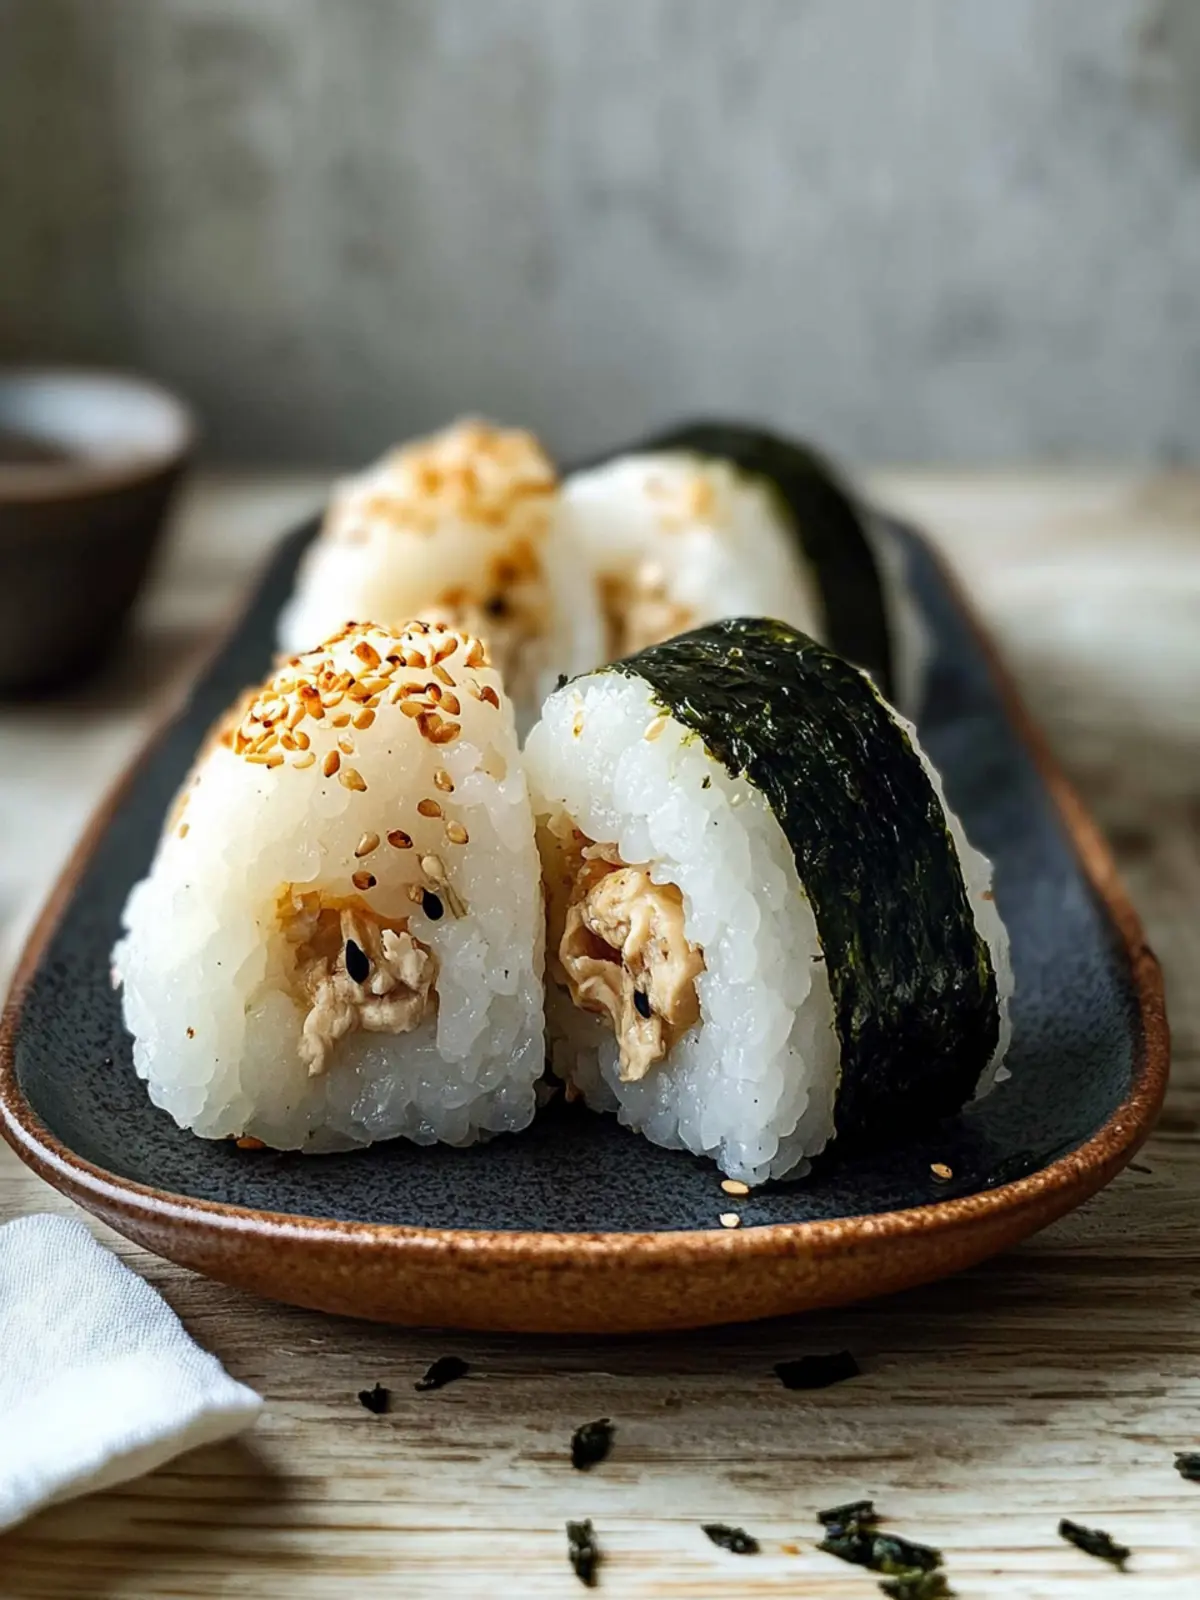
Shape the Onigiri: Wet your hands with water to prevent sticking. Scoop about ⅓ cup of the seasoned rice into one palm. Create a small well in the center and add 1 tablespoon of the cooked chicken filling. Scoop another ⅓ cup of rice to cover the filling and carefully mold into a triangle shape. Wrap each onigiri with a small rectangle of nori for added flavor.
Optional: Garnish with extra furikake for a burst of flavor and color!
Exact quantities are listed in the recipe card below.
How to Store and Freeze Chicken Onigiri
Fridge: Store leftover Chicken Onigiri in an airtight container for up to 3 days. If using nori, wrap it separately to maintain crispness.
Freezer: For longer storage, freeze unwrapped onigiri in a single layer on a baking sheet. Once frozen, transfer to a freezer bag for up to 1 month.
Reheating: Thaw in the fridge overnight and reheat in the microwave for 20-30 seconds, or until warmed through. Enjoy the homemade flavors!
Room Temperature: Serve fresh Chicken Onigiri at room temperature for picnics or gatherings, but avoid holding them out longer than 2 hours for safety.
Expert Tips for Chicken Onigiri
Handy Rice Tips: Ensure your sushi rice is slightly warm when shaping, as this helps it stick better. Cold rice can crumble!
Marination Matters: Don’t skip marinating the chicken for at least 30 minutes; it allows those teriyaki flavors to penetrate and enhance the taste of your Chicken Onigiri.
Sauce Thickness: Cook the teriyaki sauce long enough to achieve a thick glaze; this prevents it from making the onigiri soggy.
Hands Wet: Wetting your hands with water before handling the rice helps prevent sticking, making it easier to shape those perfect triangles!
Customize Fillings: Feel free to experiment! Try other proteins or pickled vegetables as fillings to keep your Chicken Onigiri exciting and new.
What to Serve with Chicken Onigiri?
Create a delightful dining experience that beautifully complements your homemade treat with these enticing pairings.
-
Light Miso Soup: This warm, umami-rich soup enhances the flavors of your onigiri while providing a comforting start to your meal. It’s light yet satisfying, making it an ideal companion.
-
Japanese Pickles: A mix of tangy and crunchy pickles offers a refreshing contrast to the savory teriyaki chicken. Their vibrant flavors elevate the dining experience, balancing the rich tastes.
-
Steamed Edamame: These tender, lightly salted soybeans add a healthy and satisfying crunch. They make a wonderful appetizer while welcoming guests to your flavorful meal.
-
Cucumber Salad: A crisp salad with sesame dressing brings a cool, refreshing element that complements the warm Chicken Onigiri. The crunch of fresh cucumber enhances each bite, making it a lively addition.
-
Dipping Sauces: Offer a variety of dipping sauces like soy sauce or spicy mayo to enhance customization. This interactive element encourages guests to savor the flavors in their unique way.
-
Bubble Tea: A fun and trendy drink choice, bubble tea with its chewy tapioca pearls provides a whimsical twist. This sweet beverage pairs delightfully with the savory onigiri, making for a memorable contrast.
Each of these pairings brings different textures and flavors, ensuring a well-rounded meal that celebrates your Chicken Onigiri masterpiece!
Make Ahead Options
These Chicken Onigiri are perfect for busy weeknights or meal prep enthusiasts! You can prepare the sushi rice and marinated chicken up to 24 hours in advance. Simply mix the cooked sushi rice with salt and furikake, then store it in an airtight container in the refrigerator, ensuring it stays moist. Marinate the chicken as detailed in the recipe and refrigerate it as well. When ready to serve, simply cook the marinated chicken as instructed and shape the onigiri using the prepped rice. This method keeps your onigiri just as delicious while saving you time on hectic days! For best results, assemble the final rice balls just before eating to maintain freshness and texture.
Chicken Onigiri Variations
Discover how fun and flexible Chicken Onigiri can be with these tempting twists and swaps that will ignite your creativity!
-
Veggie Delight: Swap the chicken for your favorite sautéed vegetables like mushrooms, bell peppers, or spinach for a vibrant, plant-based onigiri.
-
Spicy Addition: Mix in some sriracha or a dash of chili flakes to the chicken marinade for a delightful kick that will awaken your taste buds!
-
Brown Rice Base: Use brown rice instead of sushi rice for a nuttier flavor and added health benefits, keeping the comfort intact with a nutritious twist.
-
Sesame Crunch: Add toasted sesame seeds to the rice for a delightful crunch and rich nutty flavor that elevates every bite to new heights.
-
Tuna Twist: Swap out the teriyaki chicken for canned tuna mixed with mayo and a splash of soy sauce, creating a quick, tasty alternative that kids love!
-
Sweet Touch: For a fun dessert option, fill your onigiri with sweetened red bean paste or a dollop of fruit preserves for a charming sweet treat.
-
Herbal Infusion: Incorporate fresh herbs like cilantro or basil into the rice for an aromatic and refreshing change that lightly brightens each bite.
-
Nori Variants: Experiment with flavored nori sheets, like wasabi or teriyaki, to enhance the wrapper and introduce an added flavor layer without much effort!
Let your imagination run wild! Each variation promises a unique experience and shows just how versatile and delightful chicken onigiri can be!
Chicken Onigiri Recipe FAQs
What kind of rice should I use for Chicken Onigiri?
Absolutely! For the best results, use short-grain sushi rice. This type of rice has the sticky texture needed to hold the onigiri shape. Make sure to rinse the rice thoroughly before cooking to remove excess starch, which can result in a gummy texture.
How should I store leftover Chicken Onigiri?
Store leftover Chicken Onigiri in an airtight container in the refrigerator for up to 3 days. If you’ve wrapped them in nori, I recommend keeping the nori separate to ensure it stays crispy. When ready to eat, you can enjoy them cold or at room temperature!
Can I freeze Chicken Onigiri?
Yes, you can! To freeze unwrapped onigiri, lay them flat on a baking sheet and freeze until solid. Then, transfer them to a freezer bag and store for up to 1 month. For best results, thaw in the refrigerator overnight and warm them in the microwave for 20-30 seconds.
How can I avoid my Chicken Onigiri falling apart?
Very! The key is to ensure your sushi rice is slightly warm when shaping it, as this helps it stick together better. Also, wet your hands before handling the rice to minimize sticking. If the rice is too cold, it can crumble easily, so always prep it while warm.
Are there any dietary considerations with Chicken Onigiri?
Of course! If you’re making this for someone with allergies, keep in mind the soy sauce and sake both contain gluten. There are gluten-free soy sauce options available! Additionally, for a vegetarian version, you can substitute the chicken with sautéed vegetables or tofu to suit different dietary needs.
Delicious Chicken Onigiri: A Twist on Homemade Comfort
Ingredients
Equipment
Method
- In a large bowl, combine cooked sushi rice with ½ teaspoon of salt and optional 2 tablespoons of furikake. Mix gently and set aside to cool slightly.
- Cut chicken into small pieces, add 2 teaspoons of soy sauce, 1 tablespoon of sake (or water), ¼ teaspoon of baking soda, and 1 teaspoon of cornstarch to a bowl. Mix until coated and refrigerate for 30 minutes.
- Whisk together 1 ½ tablespoons of soy sauce, 1 tablespoon of mirin, and 1 tablespoon of brown sugar in a small bowl until combined to make teriyaki sauce.
- Heat 1 tablespoon of oil in a pan over medium-high heat. Add marinated chicken and cook for 2-3 minutes until cooked through.
- Lower heat to medium, stir in minced garlic, cooking for 30 seconds until fragrant, then pour in teriyaki sauce mixture and cook until thickened.
- Wet your hands with water, scoop about ⅓ cup of seasoned rice into one palm, add 1 tablespoon of chicken filling, then cover with another ⅓ cup of rice and mold into a triangle. Wrap each onigiri with a small rectangle of nori.