
As I stood in my kitchen, I felt the familiar weight of a long day lifting away. I had been craving something sweet and surprisingly different — and that’s when it hit me: mochi brownies! This delightful fusion of chewy mochi and rich chocolate is like a comforting hug on a plate. The first time I tasted this molten chocolate rice cake, I was mesmerized by its unique texture and intense flavor.
Not only does this recipe bring a playful twist to traditional brownies, but it also comes together in just a few simple steps. With ingredients you likely have on hand, you can create a dessert that impresses family and friends while satisfying that sweet tooth. Whether it’s a cozy night in or a gathering with loved ones, these mochi brownies are sure to be a showstopper. So, roll up your sleeves, and let’s immerse ourselves in a delicious adventure that will make your taste buds dance!

Why are Mochi Brownies a must-try?
Irresistible texture: These mochi brownies offer an enticing combination of chewy mochi and fudgy chocolate, making every bite a delightful experience.
Quick and easy: With just a few simple ingredients and straightforward steps, you can whip up this dessert in no time—perfect for busy weeknights or unexpected guests!
Decadent chocolate: A layer of molten chocolate on top elevates these brownies to a whole new level of indulgence.
Crowd-pleaser: Serve them at your next gathering, and watch as everyone raves about this unique twist on a classic treat.
Versatile creation: Feel free to get adventurous and mix in your favorite nuts or toppings for a personalized touch, making this recipe truly yours.
Mochi Brownies Ingredients
For the Brownies
- Glutinous rice flour – the key to achieving that delightful chewy texture in your mochi brownies.
- Granulated sugar – balances the chocolate richness, ensuring just the right level of sweetness.
- Cocoa powder – adds deep chocolatey flavor; for richer taste, opt for Dutch-processed cocoa.
- Baking powder – helps the brownies rise slightly, providing a great balance to the dense mochi.
- Salt – enhances overall flavors, making the chocolate taste even more profound.
- Egg – binds the ingredients together, creating a moist and fudgy consistency.
- Unsalted butter – contributes to the richness; melted for smooth incorporation into the batter.
- Milk – adds moisture to the mixture, ensuring every bite remains soft and velvety.
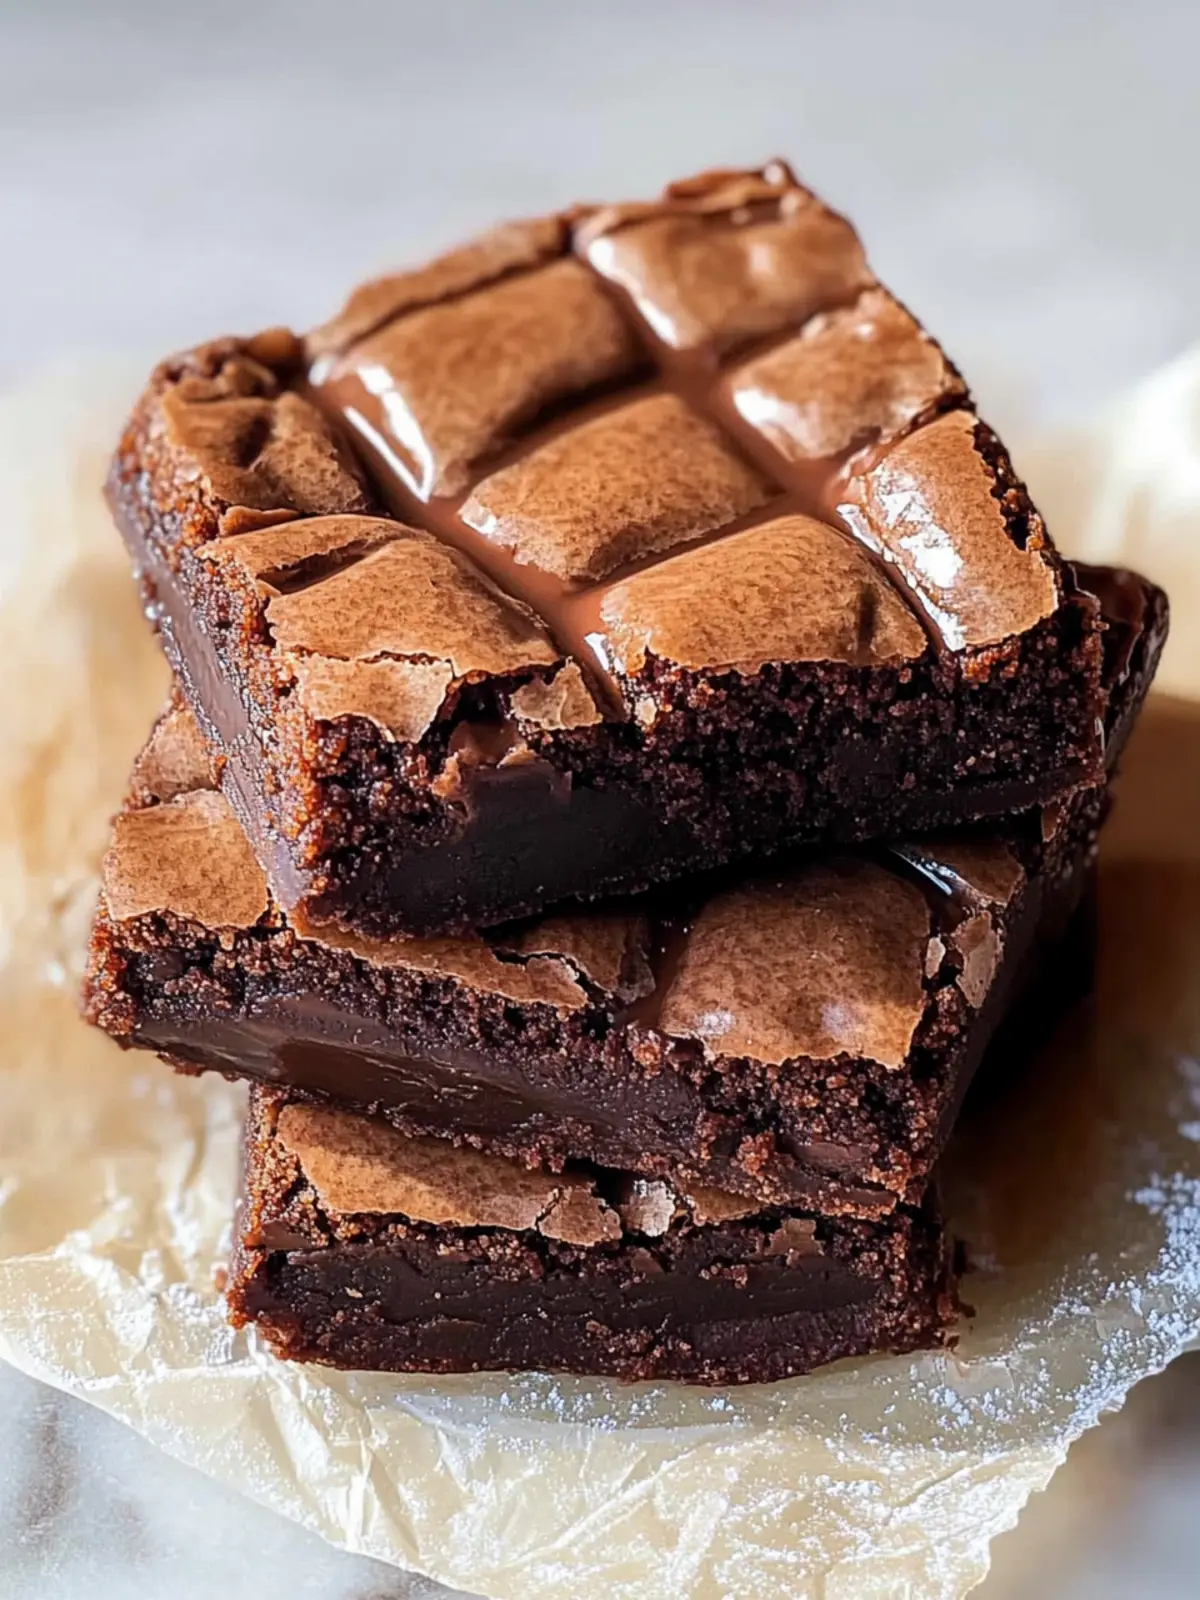
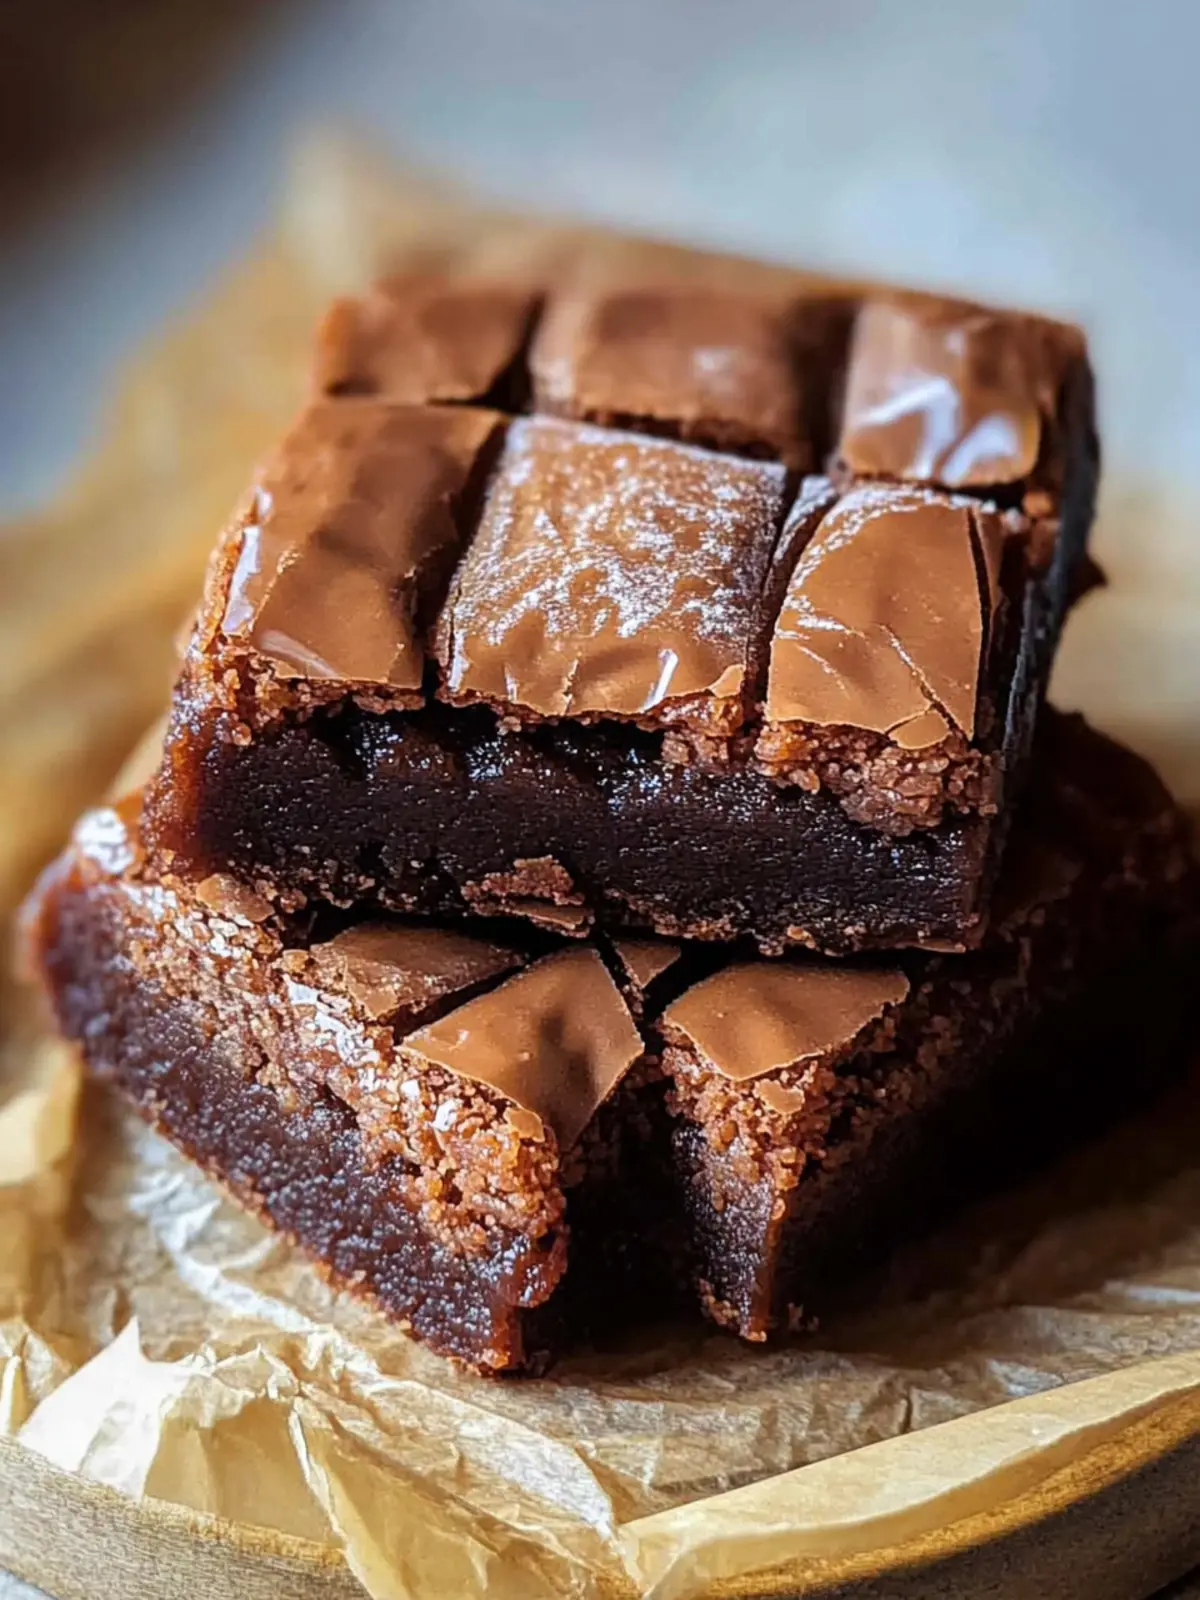
- Chocolate discs – create that irresistibly gooey middle; don’t be shy with generous layers!
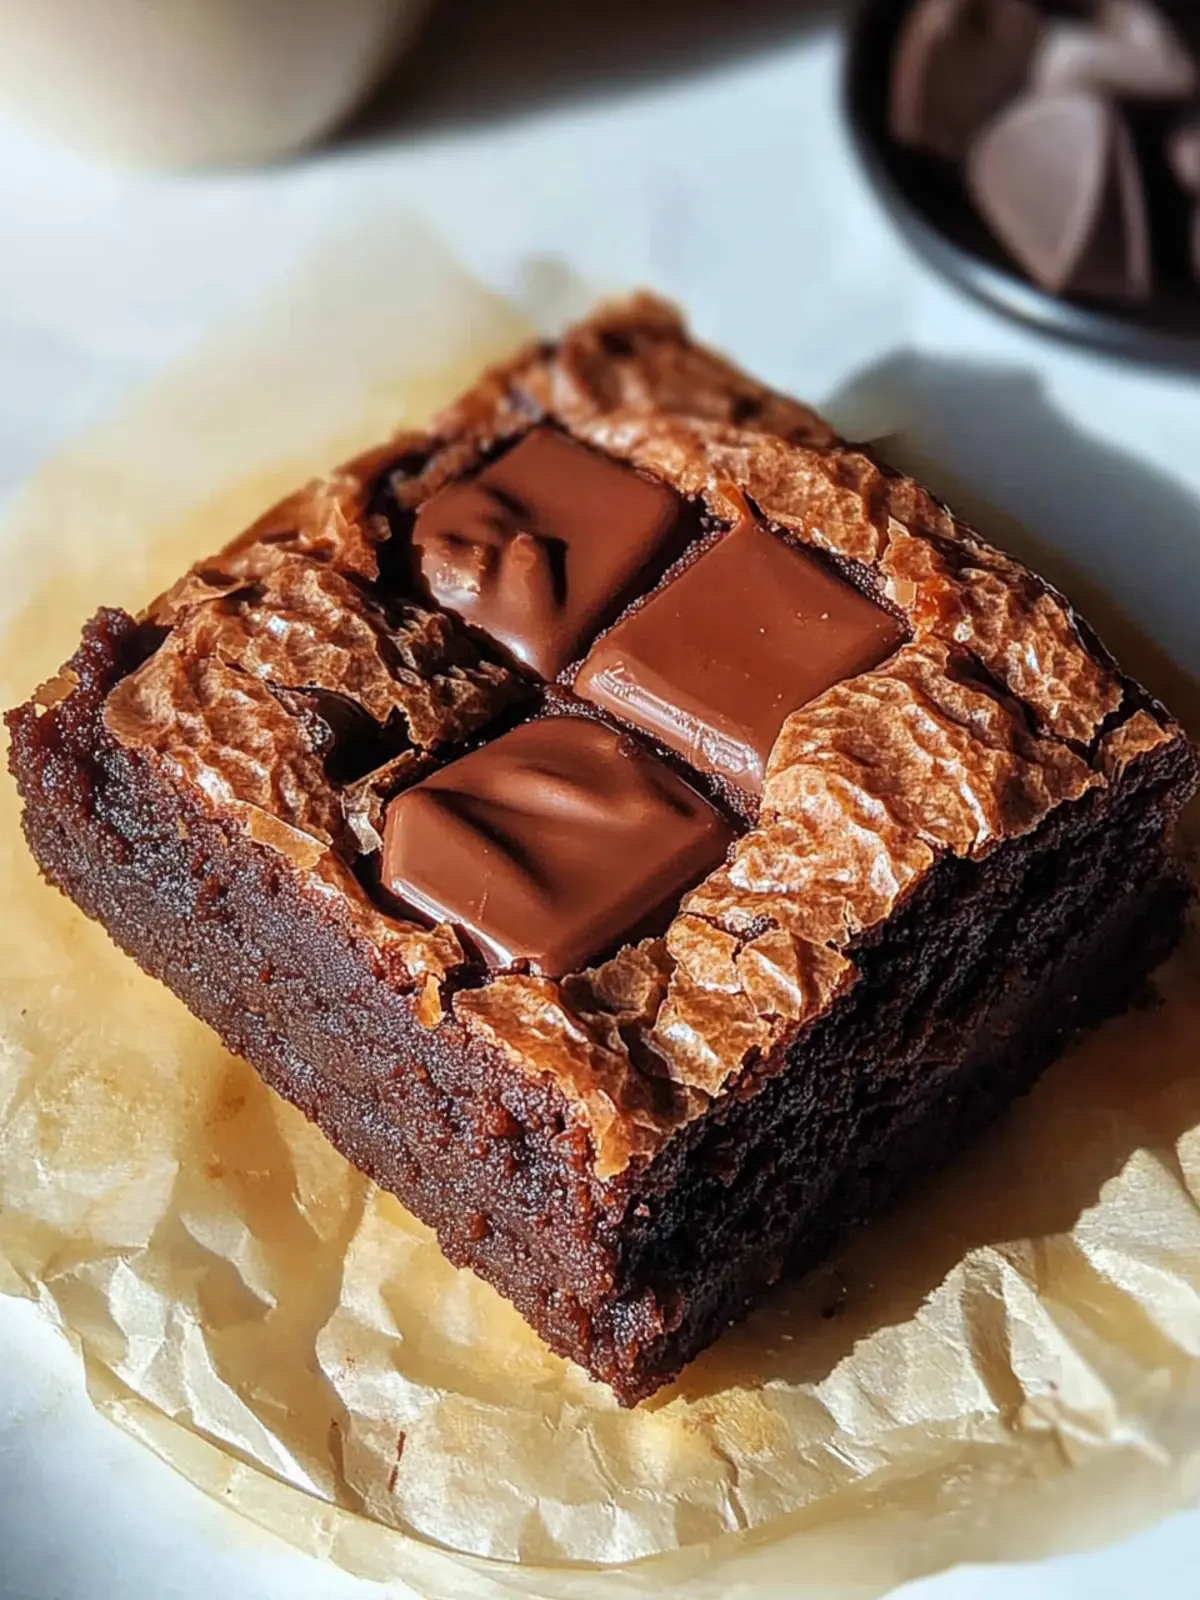
- Chocolate bar – when melted atop the sliced brownies, it creates an extra dose of molten chocolate bliss.
Embrace the magic of making these mochi brownies; every ingredient plays a crucial role in turning out this luscious dessert.
How to Make Mochi Brownies
-
Prepare the pan: Line a 6-inch cake pan with parchment paper, ensuring it covers the bottom and sides for easy removal. Preheat your oven to 355℉/180℃ while you get the batter ready.
-
Mix dry ingredients: In a mixing bowl, whisk together the glutinous rice flour, sugar, cocoa powder, baking powder, and salt until fully combined. The mixture should have an even, light brown color.
-
Combine wet ingredients: In another bowl, mix the beaten egg, melted butter, and milk until smooth. The warmth of the melted butter will help blend everything nicely.
-
Combine wet and dry: Pour the wet ingredients into the bowl with dry ingredients, stirring gently until you have a smooth, consistent batter. This is where the magic begins!
-
Layer the batter: Pour half of the batter into your prepared cake pan. Add a generous layer of chocolate discs over the top, then pour the remaining batter over them, smoothing the top with a spatula for a nice finish.
-
Bake the brownies: Place your filled cake pan in the preheated oven and bake for 45 minutes. You’ll know they’re done when they spring back slightly when touched.
-
Cool and slice: Once baked, remove the pan from the oven. Gently lift the mochi brownie out using the parchment paper and transfer it to a cutting board. Cut the brownies into 6 pieces.
-
Add molten topping: If desired, place a chocolate bar slice on top of each brownie and return them to the oven at 220°F/105℃ for 2 minutes. This will create a luscious molten chocolate topping that you won’t forget!
Optional: Serve with a scoop of vanilla ice cream for a delightful contrast.
Exact quantities are listed in the recipe card below.
Mochi Brownies Variations
Feel free to sprinkle some creativity in your mochi brownies and discover delightful twists along the way!
-
Gluten-Free: Substitute glutinous rice flour with a gluten-free flour blend for a similar chewy experience without the gluten.
-
Dairy-Free: Use coconut milk and a plant-based butter alternative, ensuring everyone can indulge without compromise.
-
Nutty Crunch: Add chopped nuts like walnuts or almonds into the batter for a delightful crunch that contrasts with the soft mochi texture.
-
Flavor Infusion: Incorporate citrus zest such as orange or lemon to bring a refreshing brightness that balances the rich chocolate.
-
Chili Heat: For a surprising twist, mix in a pinch of cayenne pepper or chili powder to the batter, adding a warm kick that elevates the flavor.
-
Boozy Treat: Drizzle in a tablespoon of your favorite liqueur, such as bourbon or espresso-infused rum, for an adult version loaded with flavor.
-
Decadent Swirls: Fold in some peanut butter or Nutella for luscious swirls that create pockets of unctuous delight throughout every bite.
-
Caramel Surprise: Add a layer of caramel sauce in between the chocolate discs for an extra touch of sweetness that makes every bite a surprise.
How to Store and Freeze Mochi Brownies
Room Temperature: Store cooled mochi brownies in an airtight container at room temperature for up to 3 days to maintain their chewy texture.
Fridge: If you prefer, you can refrigerate them for up to a week. Just ensure they’re well-wrapped to prevent drying out.
Freezer: For longer storage, freeze the brownies in an airtight container for up to 3 months. Make sure to layer parchment paper between pieces to avoid sticking.
Reheating: To enjoy, simply thaw at room temperature or microwave for about 10–15 seconds for that delightful chewy experience again!
Expert Tips for Mochi Brownies
-
Ingredient Quality: Use fresh ingredients, especially the cocoa powder and chocolate, to enhance the rich chocolate flavor of your mochi brownies.
-
Mixing Technique: Avoid over-mixing the batter after combining wet and dry ingredients; this keeps the texture tender and chewy.
-
Layering Chocolate: Don’t skimp on the chocolate discs between batter layers; they’re crucial for achieving that irresistible gooey center.
-
Baking Time Awareness: Keep an eye on the baking time; ovens vary, and undercooked brownies can ruin that delicious texture you’re aiming for.
-
Cooling Patience: Allow the mochi brownies to cool slightly before slicing; this helps them set and prevents mess while cutting.
-
Serving Suggestions: Pair with fresh fruits or a scoop of ice cream to balance the rich taste of the mochi brownies for a delightful dessert experience.
What to Serve with Mochi Brownies?
Indulging in mochi brownies is a wonderful experience on its own, but pairing them with delightful accompaniments can elevate the entire dessert experience.
-
Vanilla Ice Cream: The creamy texture of ice cream perfectly complements the chewy and fudgy brownie, balancing rich flavors. A scoop on the side adds a refreshing contrast that your taste buds will adore.
-
Fresh Berries: Juicy strawberries or raspberries bring a burst of sweetness and tartness, enhancing the chocolate goodness. Their vibrant colors will make your dessert plate pop and look inviting!
-
Whipped Cream: Light and airy whipped cream adds a luscious creaminess that enhances the overall texture of the brownies. A dollop on top is a simple yet elegant touch that never fails to impress.
-
Chocolate Sauce: For chocolate lovers, drizzling warm chocolate sauce over the mochi brownies amplifies the indulgence. It creates an irresistible molten chocolate experience that feels extra decadent.
-
Espresso or Coffee: A rich cup of espresso or coffee pairs wonderfully with the sweet and chewy brownies. The bitterness of the coffee contrasts beautifully with the sweetness, creating a balanced flavor profile.
-
Coconut Flakes: Toasted coconut flakes sprinkle a tropical flair and a delightful crunch, adding an exciting texture. They not only introduce new flavors but also present a lovely visual appeal.
By thoughtfully choosing what to serve alongside your mochi brownies, you’ll create a memorable dessert experience that everyone will cherish.
Make Ahead Options
These mochi brownies are perfect for meal prep enthusiasts! You can prepare the batter up to 24 hours in advance, storing it in an airtight container in the refrigerator to keep it fresh. Additionally, you can pre-line your cake pan with parchment paper for quick access when you’re ready to bake. To maintain that delightful chewy texture, be sure to mix the wet and dry ingredients right before baking rather than too far ahead. When you’re ready to indulge, simply pour the batter into the prepared pan and bake for 45 minutes, and you’ll have a decadent treat that brings a smile to everyone’s face!
Mochi Brownies Recipe FAQs
What should I look for when selecting glutinous rice flour?
Absolutely! When choosing glutinous rice flour for your mochi brownies, look for a fine, powdery texture with no clumps. It should be pure glutinous rice flour; some brands may mix it with non-glutinous flour or additives. Check the packaging for the term “sweet rice flour” as well since that is another name it goes by.
How should I store leftover mochi brownies?
For optimal enjoyment, you can store your cooled mochi brownies in an airtight container at room temperature for up to 3 days. If you notice any signs of drying out, refrigerate them; just be sure they’re properly wrapped to keep their lovely chewy texture. Alternatively, if you have leftovers for longer, consider freezing them!
How do I freeze mochi brownies properly?
Very simple! To freeze your mochi brownies, first make sure they are completely cooled. Then, cut them into individual squares and place a piece of parchment paper between each one to prevent sticking. Arrange them in an airtight container or heavy-duty freezer bag and seal it tightly. They can be frozen for up to 3 months. When you’re ready to indulge, just let them thaw at room temperature or microwave for about 10–15 seconds to restore that delightful chewiness.
What can I do if my mochi brownies are too dense or hard?
No worries! If your mochi brownies are coming out too dense, it could be due to overmixing the batter or too much flour. When combining wet and dry ingredients, mix just until everything is incorporated. In the future, you might also consider slightly reducing the baking time, as every oven behaves a bit differently.
Are these mochi brownies safe for pets or anyone with allergies?
These mochi brownies won’t be suitable for pets, especially because they contain chocolate, which is toxic to dogs and cats. Additionally, they do include common allergens such as eggs and dairy, so if you’re preparing these treats for someone with allergies, you could consider using egg replacements or non-dairy milk alternatives. Always check ingredient labels to ensure they’re safe for everyone involved!
Mochi Brownies: Indulge in Molten Chocolate Bliss at Home
Ingredients
Equipment
Method
- Line a 6-inch cake pan with parchment paper and preheat your oven to 355℉/180℃.
- In a mixing bowl, whisk together the glutinous rice flour, sugar, cocoa powder, baking powder, and salt until combined.
- In another bowl, mix the beaten egg, melted butter, and milk until smooth.
- Pour the wet ingredients into the bowl with dry ingredients, stirring gently until you have a smooth batter.
- Pour half of the batter into your prepared cake pan and layer with chocolate discs, then pour the remaining batter over them.
- Bake in the preheated oven for 45 minutes, or until they spring back slightly when touched.
- Remove from the oven, lift the brownie out using parchment paper, and cut into 6 pieces.
- Optionally, place a slice of chocolate bar on each brownie and return to the oven at 220℉/105℃ for 2 minutes for a molten topping.